| Author | Topic |
|---|

Location:
Gold Coast, QLD
Registered:
April 2004
|
|
Matt's ST162 - 3rd Gen 3SGE Engine swap
|
 Thu, 13 October 2005 05:42

|
 |
Hey guys,
Been planning this for ages and now it's finally underway. Bought this engine about six months ago and have been waiting to have the time and money (mortgages suck!) to install it ever since! But now that work is quiet and I can take some time off, I have seized my chance. The downtime here at work also means that our workshop is quiet so I am able to use a corner of it to work on the car rather then my pitiful townhouse garage at home.
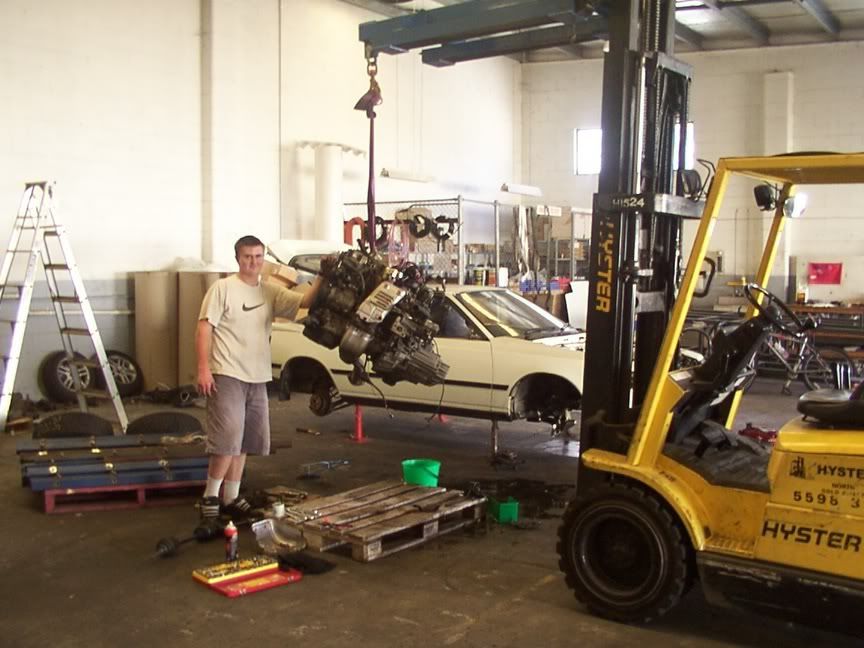
Nezz (3SGTE Man on these forums) came around last Wednesday to give me a hand with getting the engine out, the forklift here at work came in very handy! So here's a summary of week one:
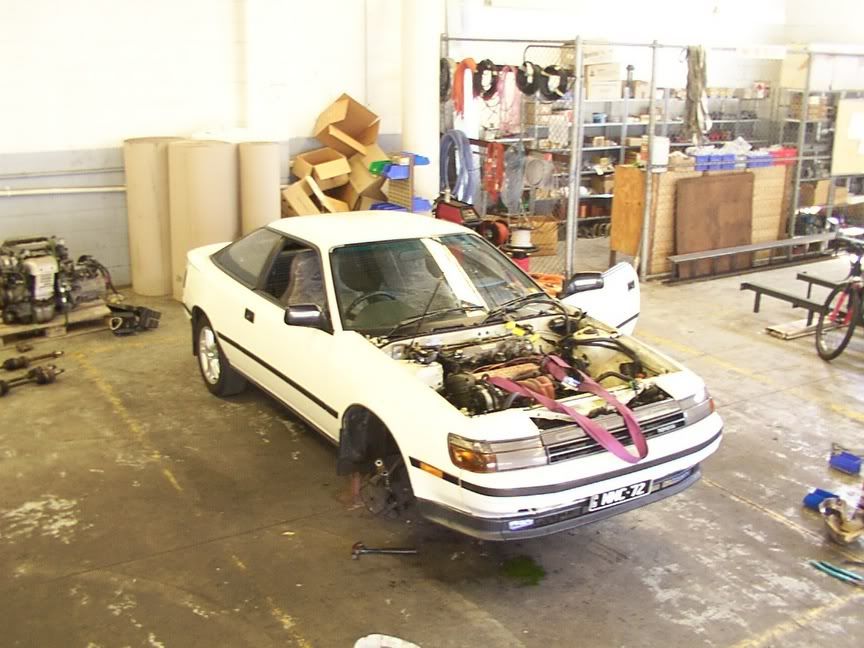
Old donk ready to be lifted out, sling in place ready for the forklift.
Forklft doing its thing. Only learnt to drive it a few days earlier (!!) but it's pretty easy.
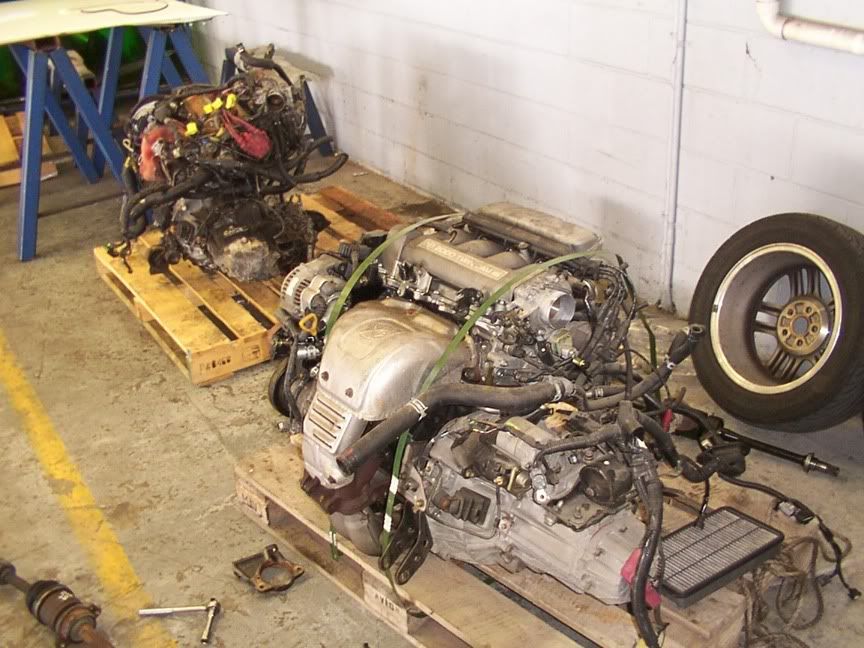
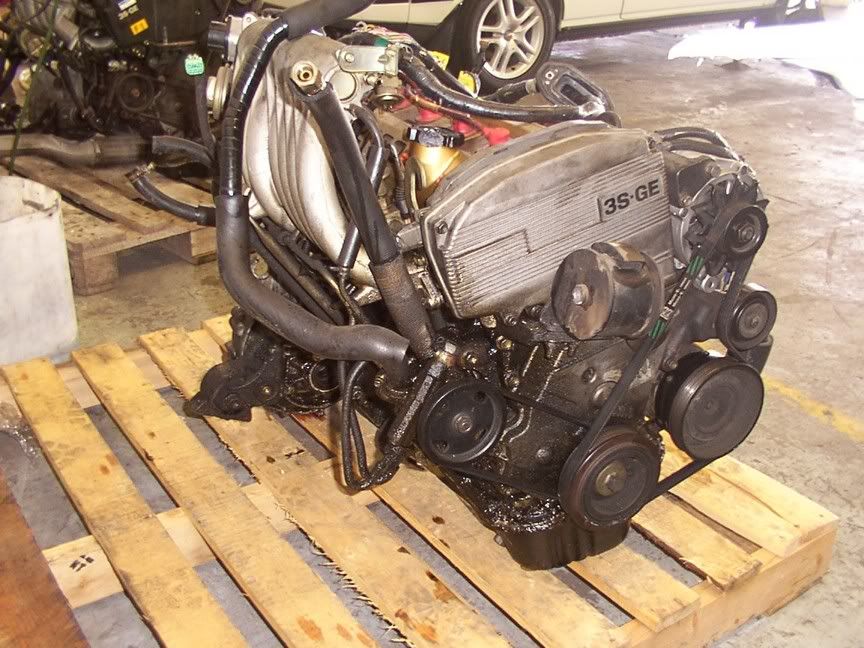
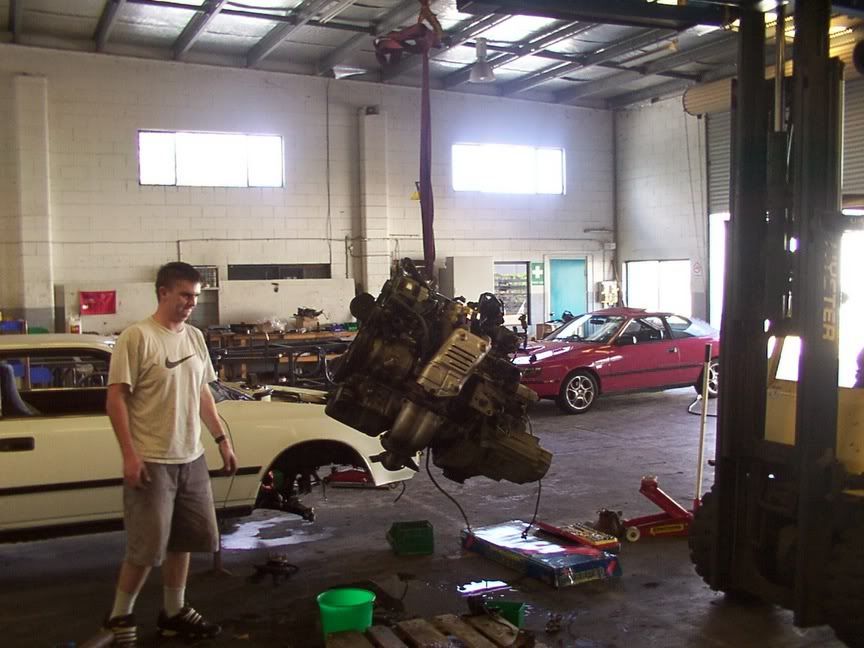
The old and the new........
Hmm, it definitely had an oil leak problem!
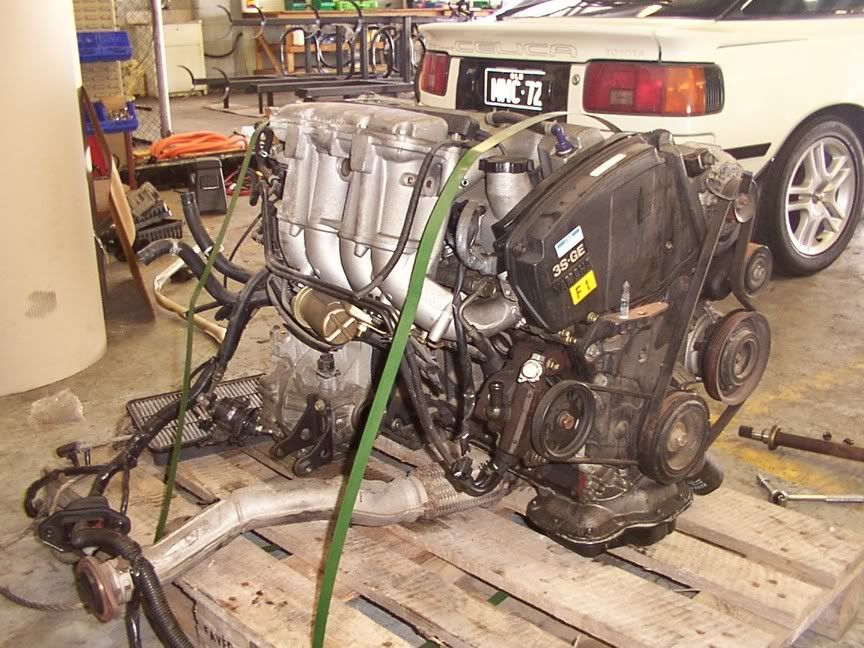
New one is gleaming in comparison!
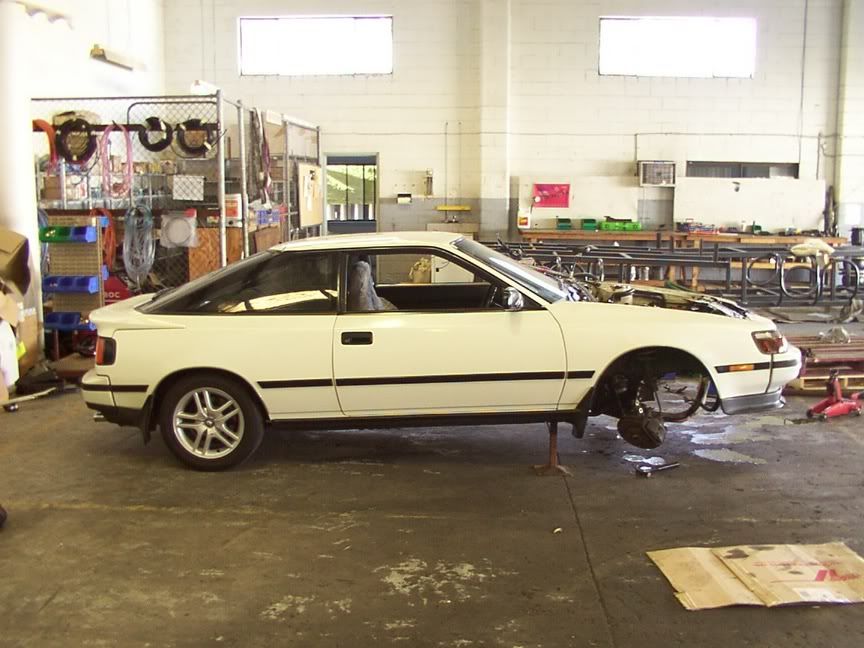
My now engineless car, in it's temporary home for the next couple of weeks.
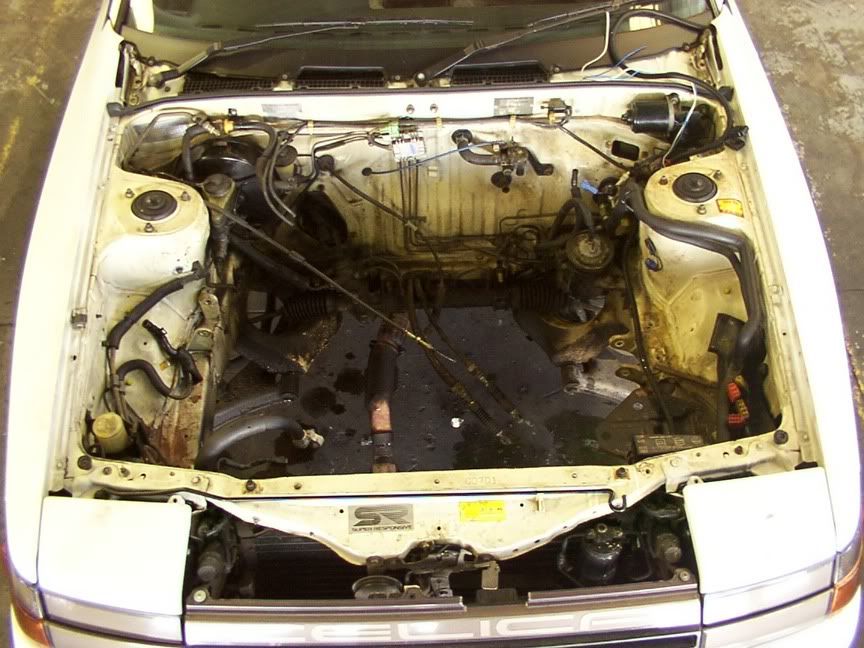
LOTS of degreaser needed here.....
Particularly right behind where the oil leak was happening!
A few days (and lots of degreaser and rags) later - much nicer!
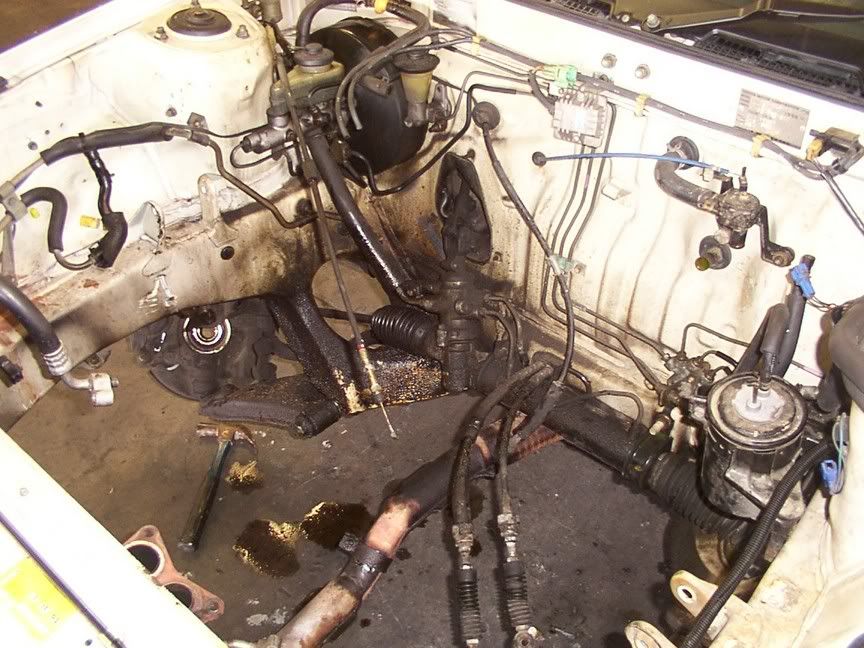
Rebuilt brake and clutch master cylinders back in place. I figured that replacing the seals in these would be cheap insurance while the engine is out and they are so much more accessible. The clutch one had about half an inch of what looked like mud in the bottom of it, didn't see it until it was drained of course.
While the engine is out, I'm also replacing the steering rack (old one was very worn, have an exchange one now waiting to go in), ball joints, tie rod ends, wheel bearings plus I will be rebuilding the brake calipers as well. In addition to that I will be painting some body and trim pieces, as well as the brake calipers. So it will be a very different car when it's all done!
More pics to come as it happens. Hope you enjoy the progress!
Matt
[Updated on: Thu, 13 October 2005 05:43]
|
|
|
Location:
Melbourne
Registered:
March 2004
|
|
|

Location:
Sydney / NSW
Registered:
March 2004
|
|
Re: Matt's ST162 - 3rd Gen 3SGE Engine swap
|
Thu, 13 October 2005 09:06

|
|
what an awesome working environment, look at all that space  . should be a great conversion matt. all the best with it. . should be a great conversion matt. all the best with it. 
Karl
|
|
|
Location:
Melbourne
Registered:
March 2004
|
|
Re: Matt's ST162 - 3rd Gen 3SGE Engine swap
|
Thu, 13 October 2005 09:13
|
|
Just looking at your pics again (reminiscing  ) and noticed the top mount on the new gearbox. Is that the original from the ST202? If so, do you reckon it'll be a straight fit into the ST162? Got the gears turning in my head again... ) and noticed the top mount on the new gearbox. Is that the original from the ST202? If so, do you reckon it'll be a straight fit into the ST162? Got the gears turning in my head again... 
|
|
|
Location:
Gold Coast, QLD
Registered:
April 2004
|
|
Re: Matt's ST162 - 3rd Gen 3SGE Engine swap
|
Mon, 17 October 2005 07:08
|
|
Hey Andy, yes the mount that is on the new gearbox is the original one from the ST202. I haven't really had a close look at it yet, but it LOOKS like the mount is in the same position as the old one and should mate up - but I'll be sure to check it closer first. (Conversely, the drivers side ST202 mount is completely different so I'll have to use the old one. No problem though, it was only my front/rear mounts that were broken, the side ones are OK.)
I'll get back to you with a definite answer mate.
|
|
|
Location:
Gold Coast, QLD
Registered:
April 2004
|
|
Re: Matt's ST162 - 3rd Gen 3SGE Engine swap
|
Tue, 25 October 2005 03:26
|
|
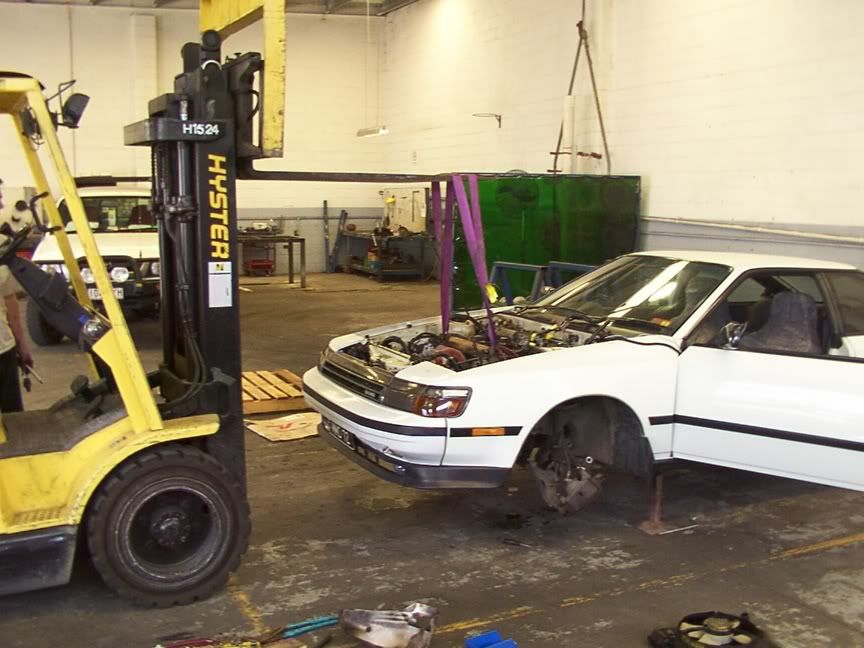
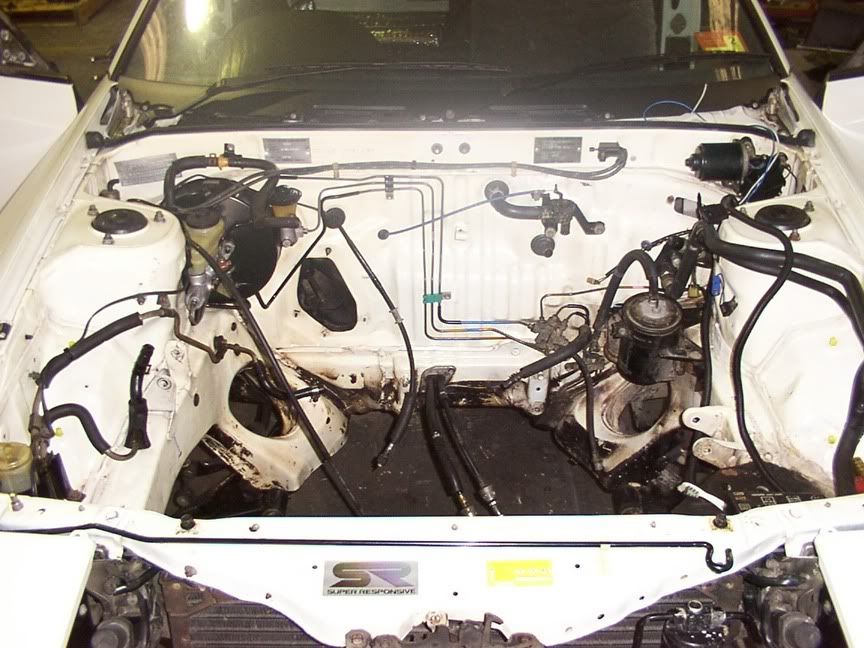
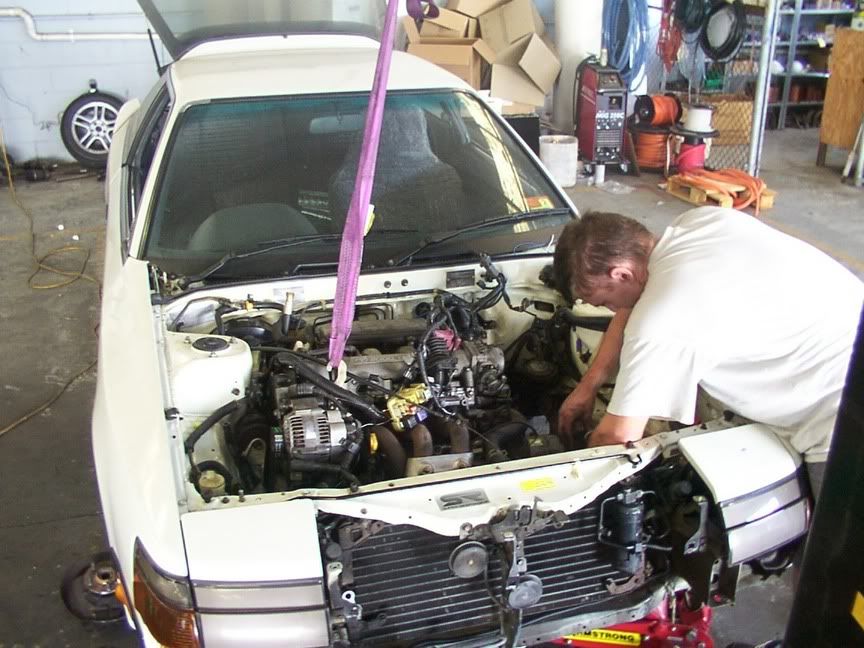
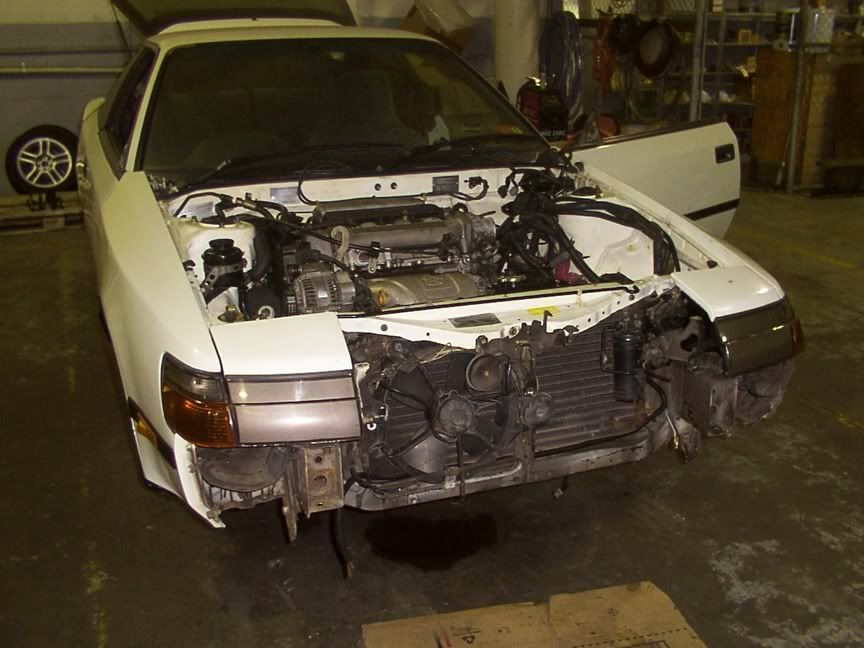
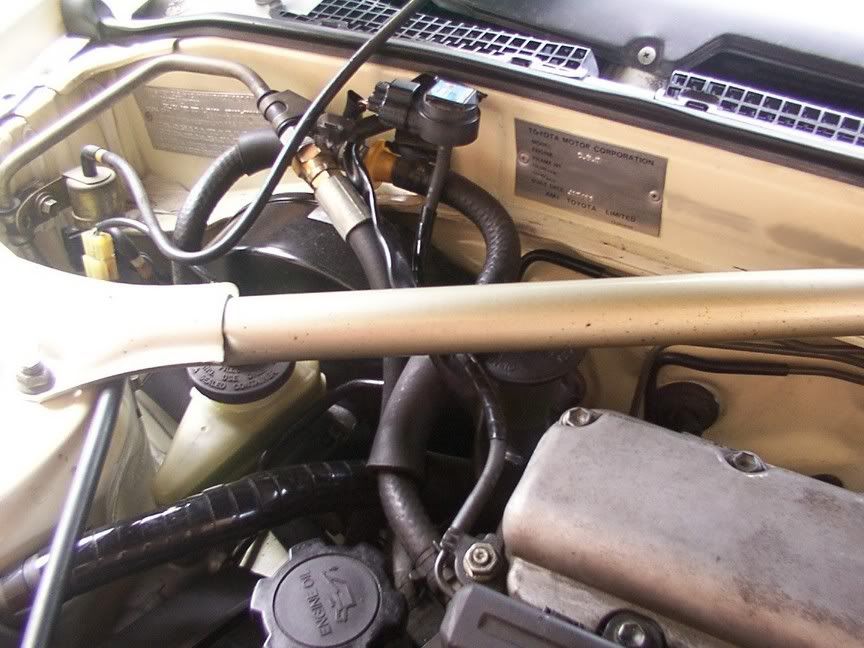
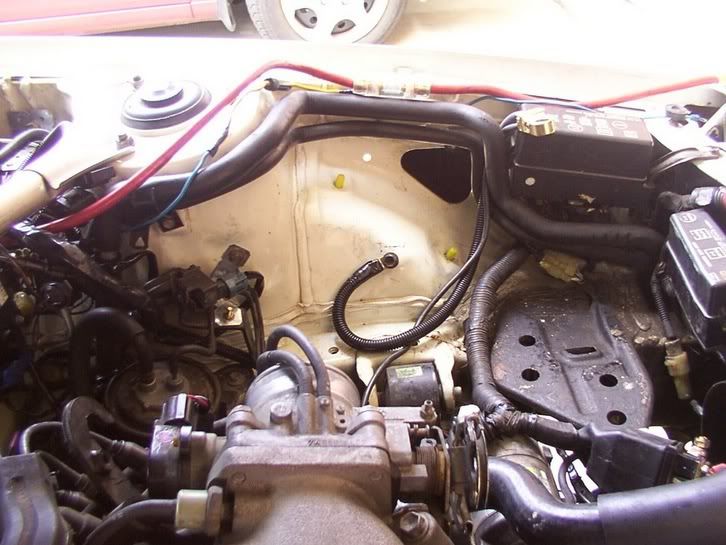
Time for an update - engine is in!!
Neil came around again on Saturday and the engine went in without any real dramas. Only thing that held us up was that we realised that the exhaust secondaries were never going to fit (Andy has told me that it fouls on the 162 crossmember anyway) so out came the angle grinder to cut it after the flex pipe.
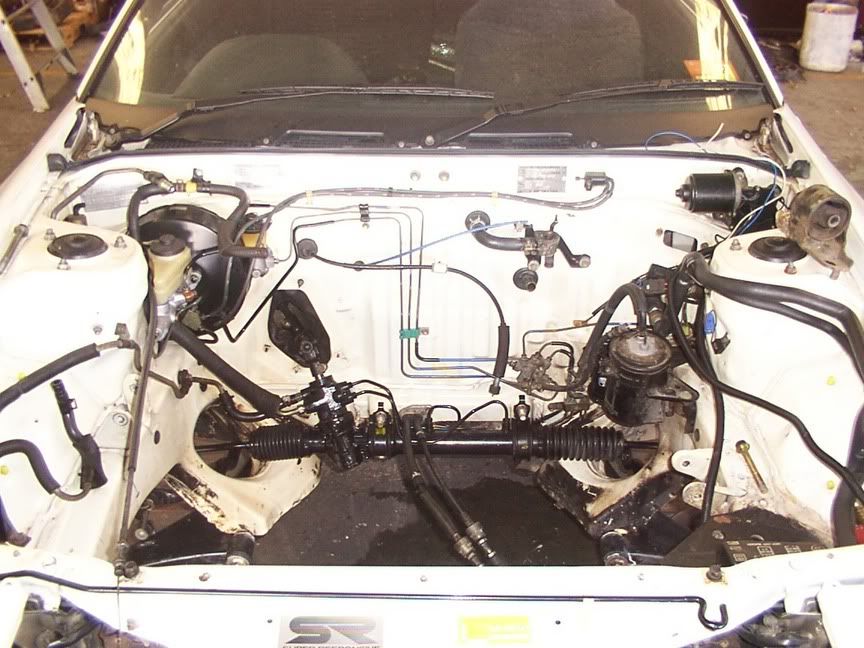
Engine bay with new steering rack, fuel filter, throttle cable etc in place ready to accept the new engine.
Trusty forklift in use once again.
Neil getting the gearbox mount sorted out.
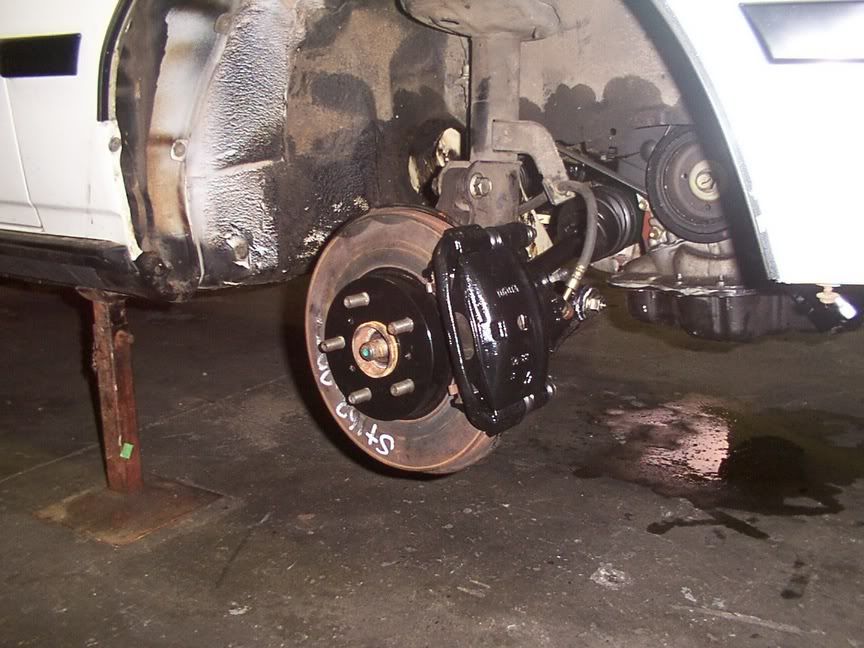
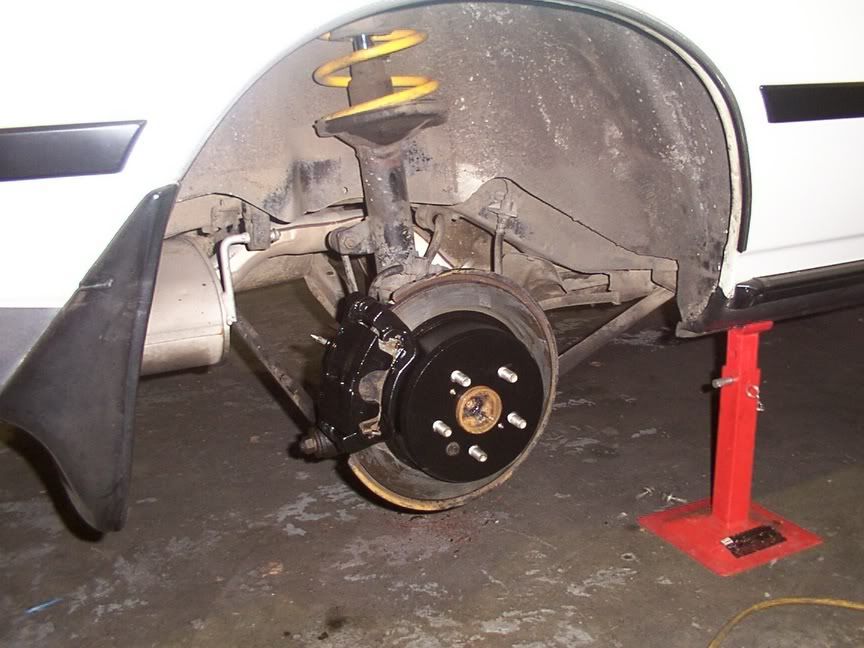
Front and rear brakes rebuilt and painted. Decided on gloss black, figured red ones would look a bit tacky on a white car. And white ones wouldn't stay white for very long! The front discs are replacements I got from a wrecker (for $25 each) that had already been machined and had more material left on them than my old ones. Both the front and rears will look a lot better once they have been scuffed by the pads! One day I'll get some DBA slotted rotors though, when the budget allows.
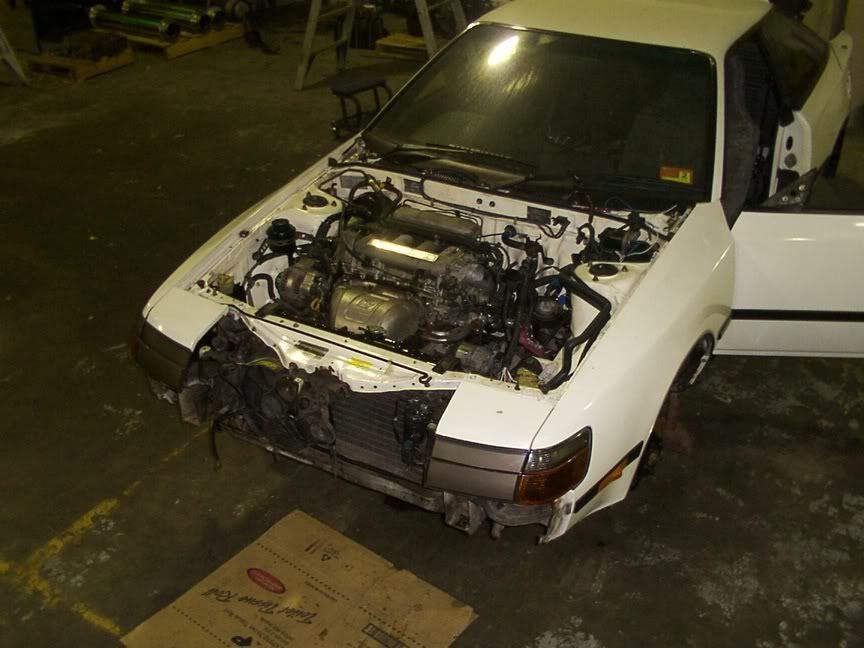
New engine nestling in the bay - not a bad half day's work! Everything lined up and went together really well.
Another view. Here you can see the front mount fan fitted which came from an ST Celica. I also grabbed the aircon pipes to suit from the same car.
Pic showing just why the front mount fan is necessary! With those sexy Gen 3 factory extractors in place there's no room for the old fan anymore. Also note the freshly painted radiator - took it to a radiator place for a flush and found out it was about 25% blocked. So it should run a lot cooler now. Also down in the bottom left (right above the brake booster) is my new power steering high pressure hose.
All that's really left for me to do now is get some new F/R engine mounts (didn't realise till too late that the ST202 ones were no good to me) and radiator hoses. Once all that's together it's wiring, exhaust and a wheel alignment and that should be it! Decided on getting a pro to do the wiring (otherwise I'd be in WAY over my head), just have to wait for one to become available. At this stage the earliest I'll be able to get someone will be this weekend, if not early next week. 
Oh well, I'm getting fit by riding my mountain bike to and from work at the moment! Big thanks once again to Nezza for his invaluable assistance.
Laters,
Matt
|
|
|
Location:
Gold Coast, QLD
Registered:
April 2004
|
|
Re: Matt's ST162 - 3rd Gen 3SGE Engine swap
|
Mon, 31 October 2005 08:48
|
|
Engine is wired up and running!!
I had an engine wiring pro come around today and he got the whole thing done in about 5 hours. (If anyone ever wants his details, let me know!) His timing couldn't have been more perfect - now I have the rest of the week to finish it off. Probably get the exhaust done on Wednesday, and wheel align on Thurs.
There's a truckload of things to finish off and put back together, but it's looking good to have it done by the end of the week. Man, I thought I was excited when the engine was dropped in last weekend - but when you hear it start up for the first time it's even better!
Matt
|
|
|
Location:
Gold Coast, QLD
Registered:
April 2004
|
|
Re: Matt's ST162 - 3rd Gen 3SGE Engine swap
|
Fri, 11 November 2005 04:18
|
|
My baby is back on the road and pretty much all done! It's certainly a different car these days - goes better, steers better, stops better....as you can imagine I am very happy with it! All went to plan last week, had the exhaust done on Wednesday and a wheel alignment on Thursday. I then spent Thursday and Friday nights getting everything put back together (particularly the interior) in readiness for an Ozcelica cruise on Saturday.
Had the exhaust done at Southport Exhaust (right around the corner from my work), and they fitted a 2.25" system with high flow cat, resonator and straight through muffler. I found this to be WAY too loud (couldn't hear myself think at idle, let alone under any kind of load during acceleration), plus it didn't feel like it had much low down torque either, certainly not much below 3000rpm. So yesterday they swapped the muffler to a more baffled one (although still less restrictive than standard) and I am MUCH happier with it. It's a lot quieter now, but still has a nice sound when you nail it. And the low rpm torque has actually improved a bit too. The guys at Southport Exhaust had no problems changing it for me at no charge, to make sure I left a happy customer - highly recommended.
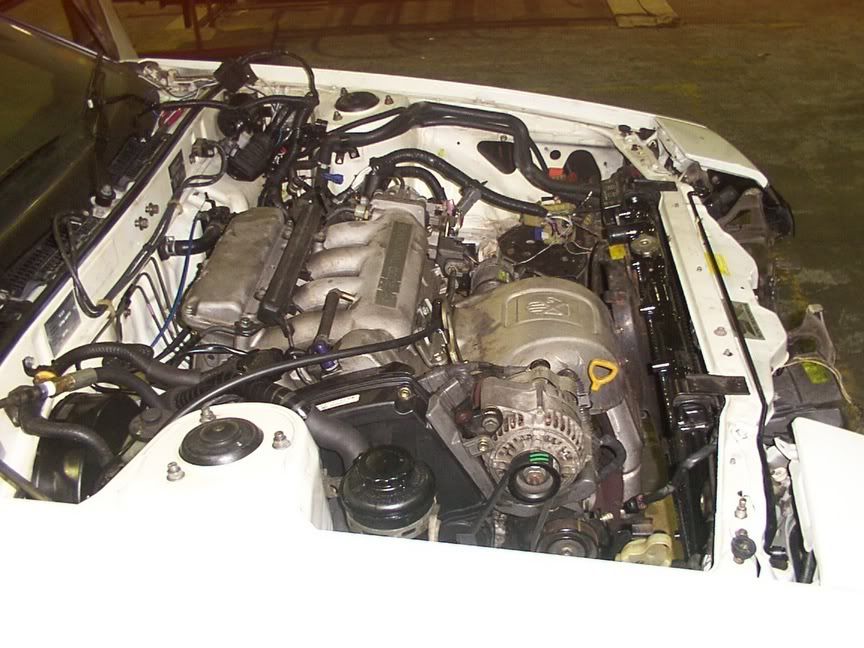
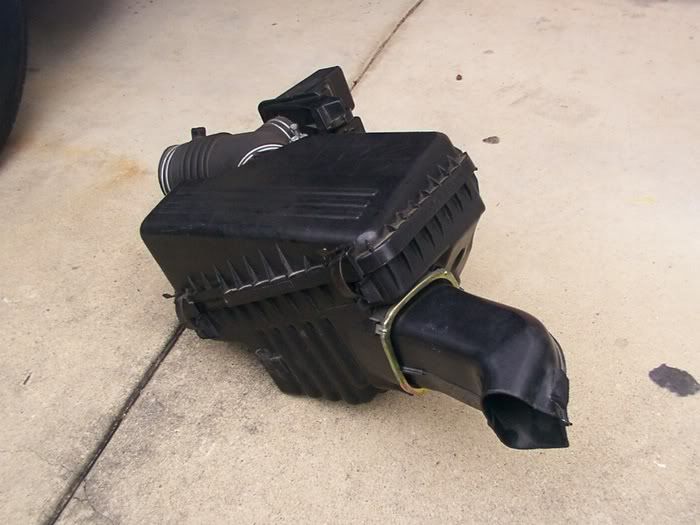
Anyway here's a shot of the engine with all the bits and pieces fitted:
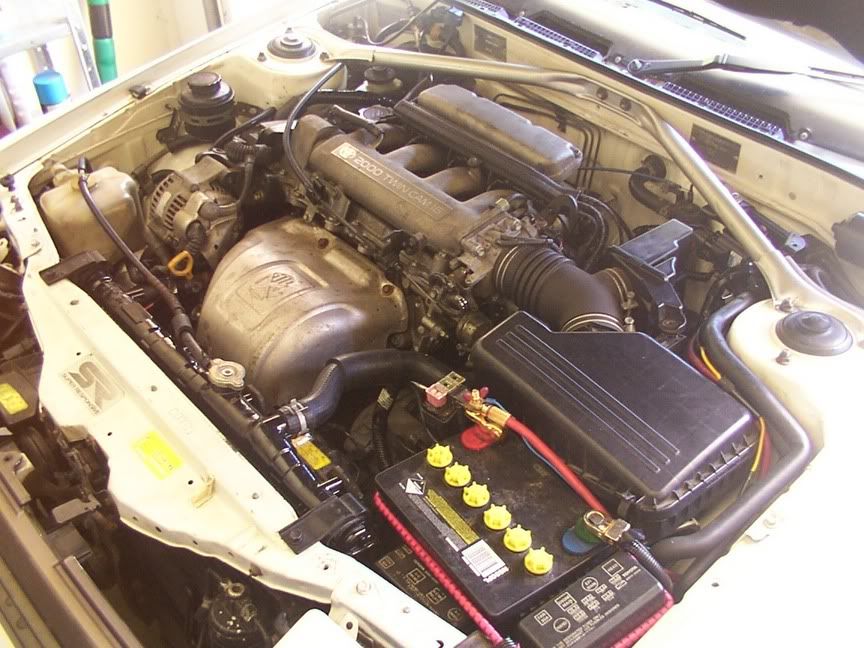
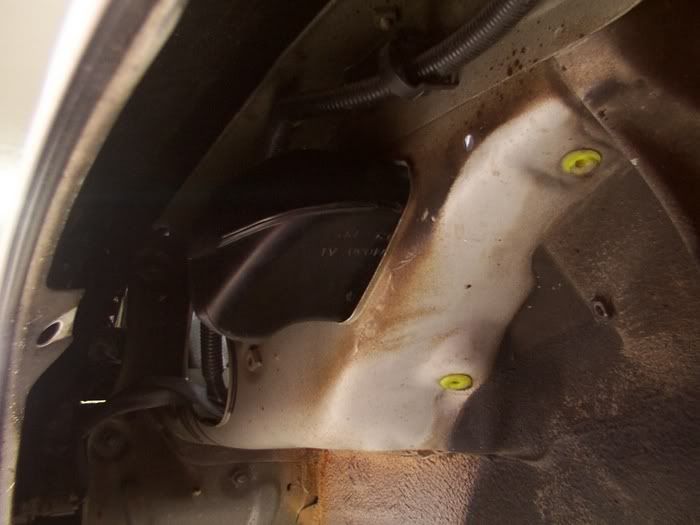
All looks nice and stock, I was really rapt with how the airbox fits very neatly into the corner in front of the strut tower - looks like it came from the factory that way! The airbox conceals a nice K&N panel filter that arrived last week. And yes that IS an occy strap around the battery.......the airbox is so much bigger than the original that the battery JUST squeezes into the space between the airbox and fuse box, such that I cannot fit battery clamp rods down the gaps because the gaps just aren't there (see below). I've also had to face the battery post clamps out to the sides for clearance.
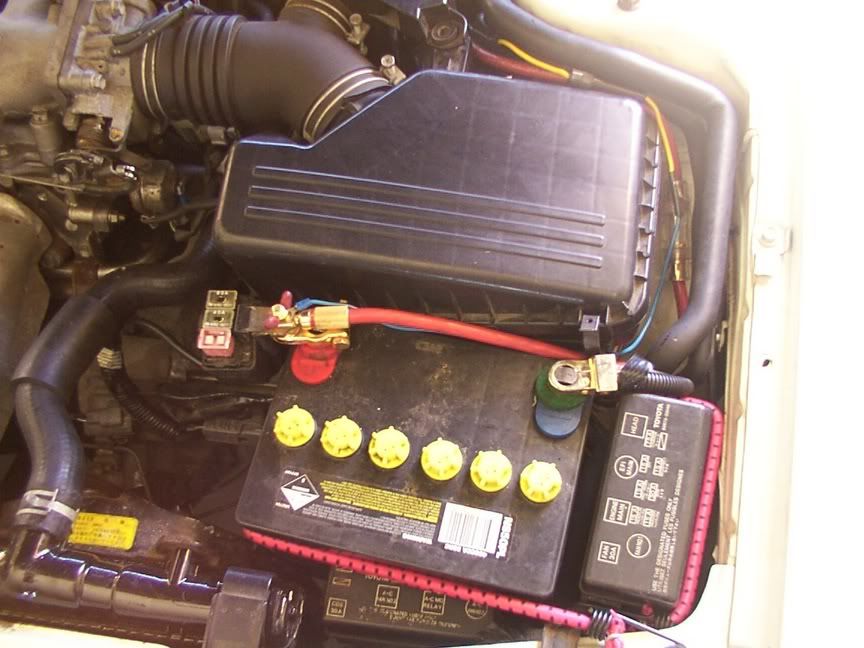
The battery is such a tight fit that it wasn't going to slide anywhere easily, I just put the strap around it to make sure it's somewhat secure. It's only a temporary fix, I'll have to figure out exactly what I'm going to do but I'm leaning towards a physically smaller battery - I'll have to see what Odyssey/Optima/etc have in their ranges. I guess if all else fails I could relocate it to the boot.
I still have a few little things left to do, the main one being the intake setup. At the moment the airbox is just drawing air from the engine bay (you can see in the pic above that there is no pipe coming out of it), but I will be addressing that this weekend. I'll post an update of it when it's done. The N-S crossmember is also interfering with the gearbox, resulting in a slight vibration. Andy had the same problem with his, so I'll be getting that sorted out too. And the aircon isn't hooked up yet, the Gen 1 hose fittings don't match the Gen 3 compressor so I'll get some adaptors made up when I have the system converted and gassed.
More updates as things get done.
Matt
[Updated on: Fri, 11 November 2005 06:38]
|
|
|
I supported Toymods
Location:
Melbourne Australia
Registered:
November 2003
|
|
Re: Matt's ST162 - 3rd Gen 3SGE Engine swap
|
Fri, 11 November 2005 17:57
|
|
Looking great!!!
i love how it all looks so stock.
|
|
|
Location:
Gold Coast, QLD
Registered:
April 2004
|
|
Re: Matt's ST162 - 3rd Gen 3SGE Engine swap
|
Mon, 21 November 2005 06:26
|
|
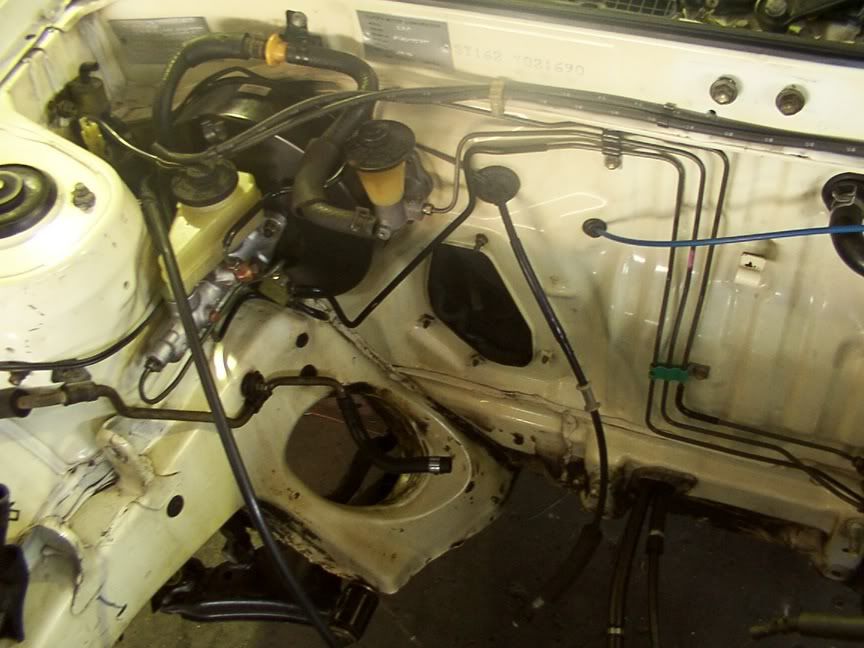
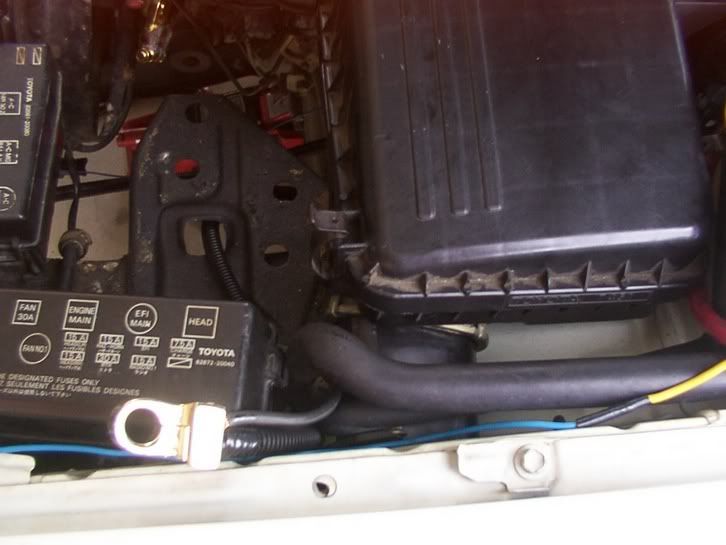
Got a few more pics, first I thought I'd show how I fitted some of the engine ancillaries for anyone who may attempt this in the future.
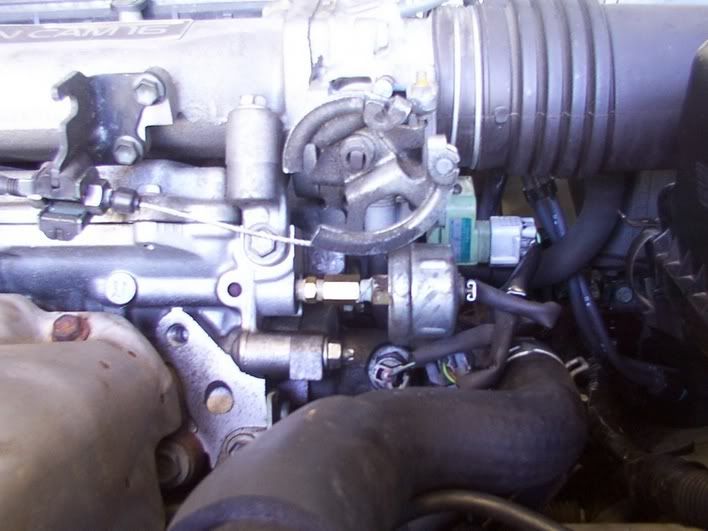
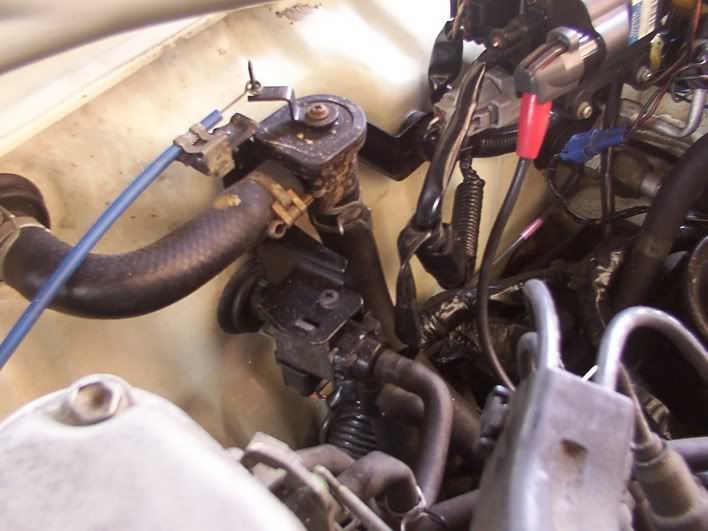
The 3rd gen comes with a different type of oil pressure sender which is not compatible with the 162, simplest thing to do is mount the original one to the new engine. The old sensor will foul on the head, so it needs to be mounted further out to clear it. I bought this pair of brass fittings for a grand total of $1.35, works a treat.
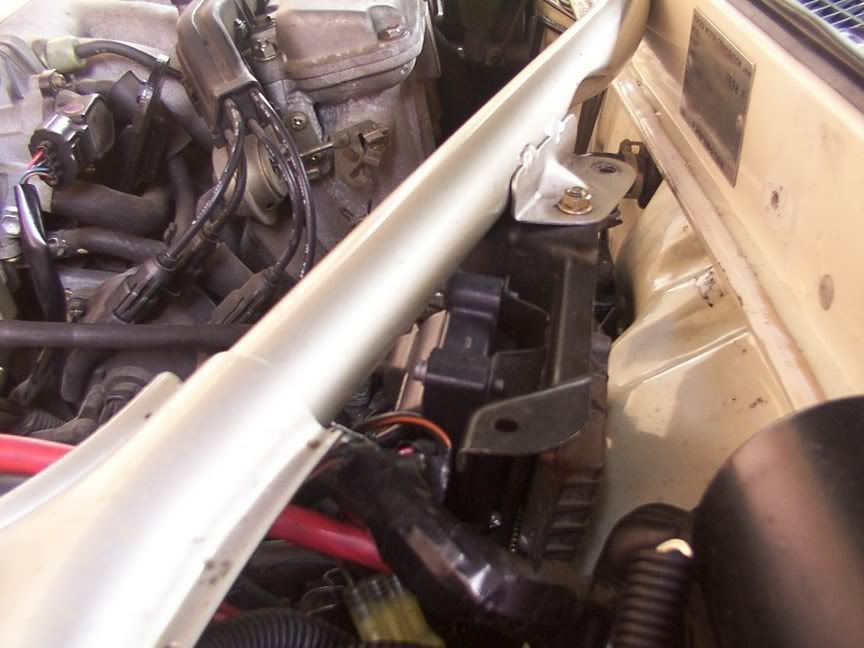
I used the ST202 charcoal cannister VSV (with the blue plug), in conjunction with the original ST162 cannister. I just fashioned up a little bracket (the silver one you can see, it's made from galvanised angle section that I get from Bunnings) and attached it to the strut tower. The two lines that lead to it (in the foreground on the left) are from the intake, right where the throttle butterfly is located - see earlier pics.
MAP sensor. Found this was the easiest place to mount it so that both connections could be made easily.
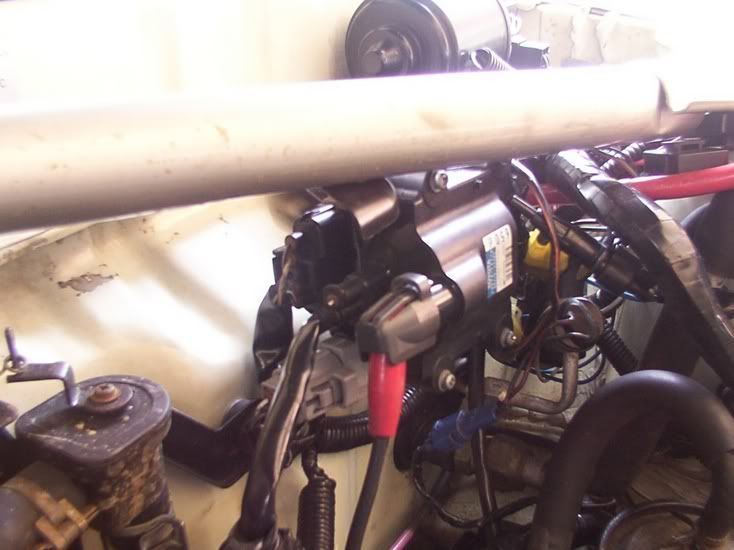
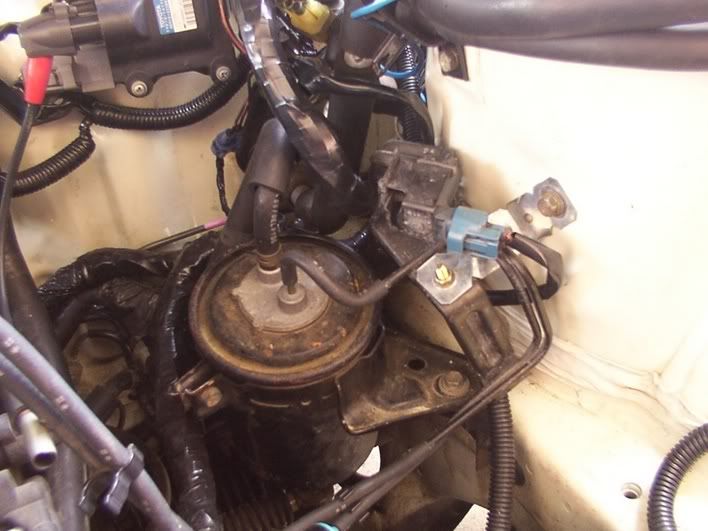
Coil & Igniter. I turned the coil around 180 degrees on the bracket (needed to grind the bracket a bit) so that all four electrical connections are at the same end - I found that made it easier to connect everything to the loom.
Looking at the coil/igniter from the other direction. Just bolted the bracket at one end to the mount on the strut brace. Not the neatest solution, but gets the job done.
A/C VSV mounted to the firewall.
To be continuued..........
|
|
|
Location:
Gold Coast, QLD
Registered:
April 2004
|
|
Re: Matt's ST162 - 3rd Gen 3SGE Engine swap
|
Mon, 21 November 2005 06:29
|
|
I have also been doing a little bit of work on the intake as well, here's what I have been up to so far:
Here is the hole in the guard for the intake pipe to come through to the airbox.
Here is the airbox removed with the matching pipe that I grabbed from the half cut. The pipe was cut just prior to where it branches off to fit the induction resonator. The main reasons that I wanted this pipe was simply to travel through the hole in the guard shown above - after that I would fit a flexible hose to take it down behind the front air dam. Plus of course it perfectly fits the hole into the airbox itself.
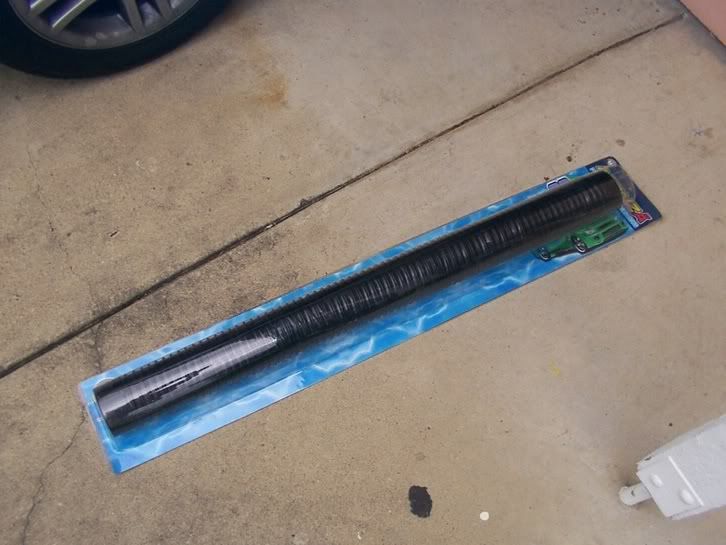
80mm flexible intake hose from Autobarn (about $25). Exactly what I had in mind!
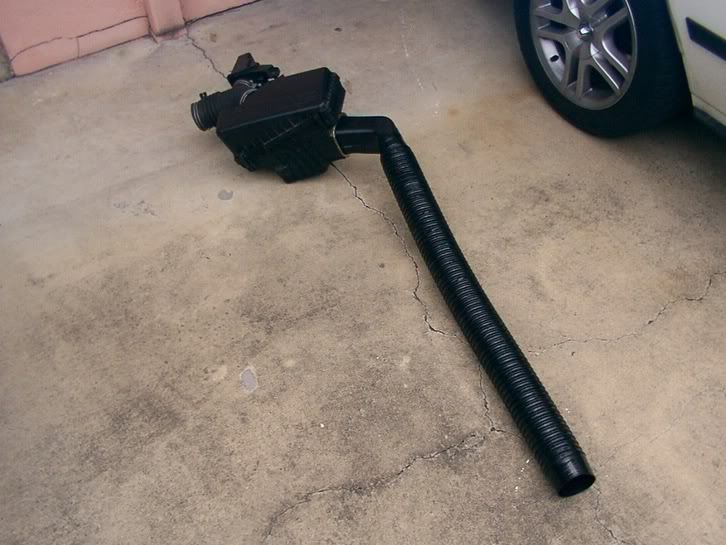
Here's the general idea - duct it out the engine bay with the ST202 pipe section, and attach the 80mm tube to lead down to the air dam. As luck would have it, the flexible tube fits nicely over the end of the ST202 pipe - they have virtually the same cross sectional area which is a bonus!

It was a tight fit, but the ST202 pipe fitted through the original hole fine.

K&N panel filter in the airbox and ready to go.
Fitting the airbox back in place, it was a relief that the pipe lined up with the airbox hole!
ST202 pipe sitting in the guard and ready to be ducted down to the air dam. Next project is to make some sort of fibreglass duct with mesh in front of it to sit behind the lower front spoiler.
Stay tuned.........
Matt
|
|
|
I supported Toymods
Location:
Melbourne Australia
Registered:
November 2003
|
|
Re: Matt's ST162 - 3rd Gen 3SGE Engine swap
|
Tue, 22 November 2005 00:57
|
|
looking good mate! 
have you driven the car yet or is it still yet to be finished? keep up the good work mate.
btw, got the rims already, but thanks anyway
|
|
|
Location:
Gold Coast, QLD
Registered:
April 2004
|
|
Re: Matt's ST162 - 3rd Gen 3SGE Engine swap
|
Tue, 22 November 2005 03:10
|
|
Yes the car has been on the road for about three weeks now, I get a very wide grin on my face every time I step into it.... 
I'm a little confused about the rims......was I offering some for sale to you at some stage or something?? Sure you haven't mixed me up with someone else? lol
Matt
|
|
|
Location:
Sydney
Registered:
October 2004
|
|
Re: Matt's ST162 - 3rd Gen 3SGE Engine swap
|
Mon, 05 December 2005 21:58
|
|
Hey matt!! that is one nice conversion there mate!
did you have any problems with low RPM Vibration from the engine?
|
|
|
Location:
Gold Coast, QLD
Registered:
April 2004
|
|
Re: Matt's ST162 - 3rd Gen 3SGE Engine swap
|
Wed, 07 December 2005 06:44
|
|
Hey Chopin,
Thanks for the compliment there mate, it's nice that so many people are appreciating it. (By contrast, I see you have bought yourself a conversion! lol)
I don't have any vibration problems as such, have you heard that this could be a common thing with these engines? Only vibration issue I have had was with a little gusset under the gearbox (that was not present on the original box) that fouled on the 162 N-S crossmember. Since I ground it away there have been no problems at all.
Matt
|
|
|