| Author | Topic |
|---|
Toymods member
I supported Toymods
Location:
Rydalmere, NSW
Registered:
May 2002
|
 Andrew's 1999 RAV4/GT-Four Hybrid ... (up for sale). Andrew's 1999 RAV4/GT-Four Hybrid ... (up for sale).
|
 Wed, 15 May 2002 14:15

|
 |
Hi all,
I bought this RAV4 back in October '01 and have wanted to make her a show-car ever since. Here's an insight into what my plans are for my toy...


YEAR/MAKE/MODEL
1999 Toyota RAV4 SXA-11R (5-door)
ENGINE
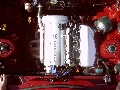
Imported Jap-spec Generation III 3S-GTE (built May 1995), fully rebuilt with ARP bolts and studs throughout, Arias forged pistons and rings (40k" O/S), head re-worked (crack welded up), Eagle forged H-beam rods, decked & re-honed block, linished crank, organic clutch (Western clutches), balanced flywheel. Engine painted Lightning Blue. All block-work done by Dominator Engines.
TURBO
Stock CT20b from ST205 3S-GTE rebuilt with 56mm steel-wheel compressor trim, hi-flowed CT26 body, bearings, housing and turbine sit in the CT20b ploished cover.
ENGINE ACCESSORIES
Custom 3" Cold Air Intake (built by Performance Metalcraft), K&N pod filter, 3S-GTE "Blitz Access" modified ECU (altered fuel and distributor curves); rocker cover, thermostat housing and turbo compressor cover all linished/polished by Ultimate Shine in Liverpool. Top-mount intercooler custom painted Royal Plum pearl, custom RAV4/GT-Four badging. TRD 71°C thermostat, 6mm leads, Iriway-8 iridium plugs. Stock thermo fan replaced for 11" unit (or the turbo would hit it). Bonnet struts soon to be fitted.
POWER OUTPUT
140.1kw at all four wheels, screaming along at 7250RPM in 3rd gear @ 158km/h, reading taken on July 3rd 2005 (Dyno Day 11, Top 4WD) on the dyno at Silverwater Auto Services. Needs more tuning, perhaps bigger injectors and N/A cams.
DRIVELINE
ST205 gearbox painted Lightning Blue, TRD Quickshifter, Grp-A ST185 diff (4.285:1 final drive ratio). ST205 front driveshafts, ST185 driveshafts on the rear.
EXHAUST SYSTEM
Custom designed and manufactured dump-pipe and O² sensor relocation, made from 2.5" 316-grade stainless, fitted up to 3" pipe to stainless hi-flow cat/converter, 4" stainless hotdog, 3" lead-out to split 3" pipes and two 3" inlet / 4.5" tip canon mufflers. Exhaust system custom tig-welded and segmented into 7 independent sections with flanges and gaskets to suit 3" system.
SUSPENSION
Front: Koni Adjustable shocks, King springs; Rear: KYB shocks, Jumbo springs. Stock 25mm front swaybar, K-Mac modified 18mm rear swaybar.
BRAKE SYSTEM
Front: DBA-690 front discs (DBA Longlife Gold, cross-drilled and slotted), Bendix Performax pads; Rear: stock discs and pads, painted calipers on all four corners.
BODYWORK
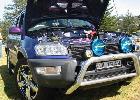
EL model Ford XR-6 bonnet vents, Nissan 200 SX triple-rib front vent, RAV4 (SSV) rear spoiler, as well as brake calipers, wiper-arms and wing mirrors and mounts all painted in Royal Plum pearl. Factory option over-fender flares fitted all round. Opposite Lock kit-out including 2.5" dia. TJM T-16 grille guard, 2 x 170-series LightForce spotties and 2 x Ion-coated foggies (with 10mm custom aluminium tabs TIG-welded to the bar for the foggies), Kingsley side-steps and stainless spare wheel cover (sold). Blue urethane mudflaps custom cut and fitted to all guards.
FUEL LINE
Internal: Walbro 255L/hour pump from Celica GT-Four; External: Bosch 500hp in-line fuel pump.
UNDERCARRIAGE
Purple under-car neon kit under the side-steps, with missile-switch activator. 
ROLLING STOCK
ANZ chrome Matrix rims (17" x 7.5", +38 offset) with Bridgestone H/P D680 Dueler (255/50R17) rubber all-round.
INTERIOR GADGETRY
A'PEXi Power FC, GReddy dual turbo timer, Auto Meter 20Psi boost gauge and Auto Meter temperature gauge in purple anodised cups and mounts, Isotta "Vallelunga" steering wheel (D-shape) with custom anodised centre disc, Isotta chrome gearknob, Isotta handbrake kit, SRacing aluminium gear shift frame with grey leather gearboot, aluminium sports pedals, 1.6mm checkerplated front floor mats.
INTERIOR LIGHTING
7" blue LED strip so far, loads more to come..... 
STEREO COMPONENTS
Stock (for now)
FUTURE MODS
Alpine A/V stereo system upgrade (WAY later)
Lower bodykit to be custom designed and fitted with Royal Plum pearl paint finish. Other parts of the vehicle to get custom paint finish (door handles Electric Blue, the rest Royal Plum pearl)
Quite a project.  BTW, pics are NOW up-to-date. BTW, pics are NOW up-to-date.
[Updated on: Wed, 07 September 2005 06:56]
|
|
|
Location:
Taree, 4h nth of syd
Registered:
May 2002
|
|
Re: 1999 Turbo RAV4 project...
|
Tue, 21 May 2002 15:22

|
|
hey bro, how r ya, i was just woundering if u have ever had your car serviced at Mosman Toyota, i swear ive seen it before  cant wait to see her when she is done cant wait to see her when she is done
Darola
|
|
|
Toymods member
I supported Toymods
Location:
Rydalmere, NSW
Registered:
May 2002
|
|
Re: 1999 Turbo RAV4 project...
|
Tue, 21 May 2002 15:50
|
|
Hey Darola,
Na man, I don't go down to Sydney anymore, unless it's for the family... I've seen 25 years of that hole, and I much prefer to be living up here in Ballina with no pollution, cleaner beaches, but unfortunately with a higher feral population, thanks to Byron Bay. 
Last time I was anywhere near Mosman was back in February this year, and none of the mods you see done on my car in the pics were completed back then. I've only had the most recent mods done since April.
Don't worry, I'm planning on entering her in the Auto Salon for 2003 (Sydney, and maybe Melbourne, depending where I am), and even better, perhaps at the Supernat's (October?) and the Summernats '04. Fingers crossed. I was planning on putting her in the Summernats '03, but she won't be completed by then. 
Everyone I've talked to so far approves of the colour scheme I've chosen, saying it's unique and it befits the car nicely.
In my dream she looks a treat when she's completed - let's hope that dream becomes reality soon. You'll see her soon enough - if not on here, then in a mag or two (with any luck, exposure-wise) or at a few shows. 
Cheers. 
|
|
|
Location:
Taree, 4h nth of syd
Registered:
May 2002
|
|
Re: 1999 Turbo RAV4 project...
|
Tue, 21 May 2002 16:03
|
|
ive nearlly fininshed my baby, i have a ae82 sedan corolla, now with a 4agze, 101 levin dash and bonnet scoop, body looks stock as a rock other then the scoop, its now 4wheel disc, 2.5" lowared, factory mags, and one big ass stereo
hopefully she will be back on the road this weekend, im going out to sss to get my computer on saturday, so first time starting then its taken me about 3weeks 200hours so far and ive got about 20h left on her. im becoming a member to toymods within days, i filled out the application today
u will know my car as soon as u see it as my number plates r Darola 
Darola
|
|
|
Toymods member
I supported Toymods
Location:
Rydalmere, NSW
Registered:
May 2002
|
 Re: 1999 Turbo RAV4 project... Re: 1999 Turbo RAV4 project...
|
Tue, 21 May 2002 16:13
|
|
I have plans for my plates too - this will be a play on words, having to do with the colour of the car. The plates are available too, but I just can't give away the name of the tags she hopefully will have. 
HINT: It will have a UV light in the back which will illuminate the Alpine A/V stereo setup I will have. No more clues. 
|
|
|
Toymods Board Member
I supported Toymods
Location:
Turramurra, Sydney.
Registered:
May 2002
|
|
Re: 1999 Turbo RAV4 project...
|
Tue, 21 May 2002 17:14
|
|
|
If the rest of the car's gonna be painted to match the purple bits, you should get 'POIPLE'.
|
|
|
Toymods member
I supported Toymods
Location:
Rydalmere, NSW
Registered:
May 2002
|
|
Re: 1999 Turbo RAV4 project...
|
Wed, 22 May 2002 01:37
|
|
Joel, that idea actually crossed my mind...
More pics to follow soon, including the wheels that will be fitted.
Cheers.
|
|
|
Toymods member
I supported Toymods
Location:
Rydalmere, NSW
Registered:
May 2002
|
|
Re: 1999 Turbo RAV4 project...
|
Wed, 22 May 2002 01:46
|
|
|
Hehe... the late Stanley Kubrik would be ever so proud of your creation Joel.
|
|
|
Location:
penrith
Registered:
May 2002
|
|
Re: 1999 Turbo RAV4 project...
|
Wed, 22 May 2002 10:32
|
|
g'day mate, we look forward to seeing your little beast, it looks good now, cant wait till it is finished! would love to have your car in autosalon with the club display! intrested????
supernats- toymods will be entering that, they dont know it yet, if u need any help etc, just ask!
|
|
|
Toymods member
I supported Toymods
Location:
Rydalmere, NSW
Registered:
May 2002
|
|
Re: 1999 Turbo RAV4 project...
|
Wed, 22 May 2002 11:49
|
|
|
Ok, so if I hold the ToyMods banner at an Auto Salon for example, does that mean that I have to become a member?
|
|
|
Toymods member
I supported Toymods
Location:
Rydalmere, NSW
Registered:
May 2002
|
 Re: 1999 Turbo RAV4 project... Re: 1999 Turbo RAV4 project...
|
Tue, 28 May 2002 15:50
|
|
Ummm, Simon? or someone? waiting on a reply to my last question.
I've never done anything like this before, and I need to know what's involved between me and ToyMods if the Auto Salon is in the equation. 
Thanks.
|
|
|
Toymods member
I supported Toymods
Location:
Rydalmere, NSW
Registered:
May 2002
|
|
|
Toymods member
I supported Toymods
Location:
Rydalmere, NSW
Registered:
May 2002
|
|
Re: 1999 Turbo RAV4 project...
|
Tue, 18 June 2002 15:39
|
|
Some more pics of the RAV...

Tried to bring out some more of the royal plum in natural sunlight... to some degree, it worked, but it stands out better under fluoro's or sodium's...

Just to show that these vents are fully-functional, unlike most of the vents that get put on cars these days. It gets quite toasty under that hood... even moreso with a turbo.
|
|
|
Toymods member
I supported Toymods
Location:
Rydalmere, NSW
Registered:
May 2002
|
 Re: 1999 Turbo RAV4 project... Re: 1999 Turbo RAV4 project...
|
Fri, 23 August 2002 16:13
|
|
Ok, finally I have pics to show you of the bashplate install and interior modifications I've made over the last couple of months.

The bashplate installed is made of 3mm checkerplate and initially wouldn't fit where it is now, without modifying the plate a little. You can only just make it out, but where the red box outline is, the bashplate has been cut to facilitate the centre chassis rail.

The pic's explanations say it all. The red arrow is for the front of the RAV4.

The first time I've won a trophy for ANY car I've owned.... It was won at a recent Lismore car show sponsored by Summerland Sports and Classic Car Club.

The first of more trophies to come?? Let's hope so....

A while back, some of you may remember that I was doing some mods to the interior of the RAV. To me the underside of the middle-console looks like something out of Terminator II. Never seeing the workings of a gear lever before, I was quite stunned that Toyota would leave a space like that so elaborate in it's function. At this time, the middle-console had been taken out to fit up an aluminium console surround.

A local guy that specialises in interior mods came up with the idea that the aluminium surround could be made to fit the console, not vice-versa, like I first thought. He got out his little hand-held grinder and went to work on the aluminium, shaping it to fit the divot in the ash-tray (outlined in red), otherwise the surround may well not have fitted flush or at all. Some modifying to the sides, 5 counter-sunk stainless screws later and voila! The feature of the middle-console is fitted.

A polish-up and she's ready to be refitted into the RAV, and the gearboot looking a darn sight smarter in grey leather. Accessories have come from Italy in the brands of SRacing and Isotta. To find out more info on these products and others, see www.primal.net.au website.

Another of SRacing's products, the handbrake kit is a fair bit better looking than the stock heat-shrunk grip that Toyota put on. Made of chrome plate and grey leather, the handbrake kit slides over the handbrake, once the stock heatshrunk grip has been cut off. It fixes itself via 2 long grubscrews and the leather boot fits over the assembly, tucking under the middle-console once refitted. What you might want to do (to avoid all the squeaking of the leather handbrake boot rubbing against the black plastic flaps that are either side of the handbrake), is remove the flaps from under the middle-console. They are only held on by plastic pegs and easily remove.

To keep with the aluminium/stainless/chrome theme of the interior so far, I also installed these alum pedals. Look pretty good with a bit of a rub with a cloth, and don't scratch easily either.

And this is what the interior looks like now. Isotta chrome gearknob, SRacing handbrake cover kit, alum pedals and aluminium surround kit, about A$300 inc. GST & freight. One thing you don't see here is the alloy gearstick garnish that I had made up a week ago, and I've sent to another guy up north to get anodised. To go with the theme of the car, it will be purple anodised, as well as the dash-mounted external gauge cups (purple) and bezels (chrome).
Hope you like the project so far. Let me know what you think of it.
Cheers.
|
|
|
I supported Toymods
Location:
Northern Beaches
Registered:
May 2002
|
|
Re: 1999 Turbo RAV4 project...
|
Tue, 03 September 2002 00:46
|
|
|
congrats on the trophy
|
|
|
Club Member
Location:
Sydney, NSW
Registered:
May 2002
|
|
Re: 1999 Turbo RAV4 project...
|
Tue, 08 October 2002 09:16
|
|
|
So will this be a full show car like the "CRYPT" Rav4??? It's a shame that got written off...
|
|
|
Toymods member
I supported Toymods
Location:
Rydalmere, NSW
Registered:
May 2002
|
|
Re: 1999 Turbo RAV4 project...
|
Tue, 08 October 2002 23:48
|
|
Well that's what the plan is... at the moment it's just getting started. Depending on what happens towards the end of this year and all of next year, I'll have the turbo dropped in sometime with an undercar neon kit and hopefully a full Alpine sound and A/V setup. Also the wheels and tyres will be soon, but at the moment things aren't getting done and by the looks of things they're aren't going to be done in the immediate future.
Just hope something else comes my way on the job front... 
|
|
|
Club Member
Location:
Sydney, NSW
Registered:
May 2002
|
|
Re: 1999 Turbo RAV4 project...
|
Thu, 17 October 2002 05:21
|
|
The plan sounds awesome...
Hope to see it in Sydney when it's done or at the Nats whenever I get down there...
Good luck with that job front eh...
|
|
|
Toymods member
I supported Toymods
Location:
Rydalmere, NSW
Registered:
May 2002
|
|
Re: 1999 Turbo RAV4 project...
|
Thu, 17 October 2002 18:24
|
|

This is what the gearstick looks like now, just a little more complete with an anodised garnish to set things off.

The front of my ride as it hopefully will be, perhaps with one less duct intake at the front (red circles)

Thanks to Phil from the RAV4World website for the use of his photo here. This is what the front end of the BomexAero bodykit looks like. I propose to do a little modifying of this to suit my current bar setup...

Try to contain the laughter - it's an idea only, for now... requires quite a bit of fine-tuning, but it's something to start off with.
Also, thanks for the kind words of encouragement - I need some more, methinks.
Cheers. 
|
|
|
Club Member
Location:
Sydney, NSW
Registered:
May 2002
|
|
Re: 1999 Turbo RAV4 project...
|
Mon, 21 October 2002 04:08
|
|
It's coming along nicely then eh???
You're right about the front bar prototype... It is a BIT rough but I can get the idea... I really like the front bar on the Blue rav4 as it is... But then again, you have the bull bar and the bash plate already so they look like they would be in the way to just put that bar on...
I really like the mesh grille on the blue Rav aswell... Are you thinking of using that aswell???
BTW, why so many lights on the front??? If you were in NSW, you'd be on the limit for lights... 6 is all you can have...
|
|
|
Toymods member
I supported Toymods
Location:
Rydalmere, NSW
Registered:
May 2002
|
|
Re: 1999 Turbo RAV4 project...
|
Mon, 21 October 2002 11:47
|
|
Hi Ben,
The mesh you see is from BomexAero as well, I believe. It's not a stock-standard Toyota accessory. I don't think I'll be changing over the grilles either, unless there's one that has allowances for a bug deflector to fit into it as well (2 screw-points).
Ben, I AM in NSW... rural NSW for now. There's hardly any streetlights around here, and what there is around here is either inadequate or in desperate need of replacement. Parking lights, low-beams, high-beams, foglamps and spotlights. I know that the idea of having a grille-guard (or "Clayton's" bullbar) isn't going to sit real well with a few people who are more into streamlining their cars for speed and less weight, but fair go - the stock standard RAV4 is reportedly over 1300kg's. It's never meant to go fast or look THAT good, but I'm going to defy the trend, and turn a few heads while I'm at it. It's a new concept of mating rural functionality (nudgebar, bashplate and extra lights) with sporty individual styling (custom bodykit), and I've been told that it can be done, so I'm all for it.
Apparently, the Blue RAV4 (Phil's) has it's front bar about 170mm from ground-level. To be sure, I'm going to make mine about 180mm from the ground, and the back will be about 250mm from the ground as well.
I gave it a go over with Meguiar's Quik Wax on the weekend, and it does a better job than the bottled stuff that you spend hours doing instead. Results speak for themselves, being a dark-coloured car too, it's finish is very glossy and 'deep'. I'll put up some new pics of it soon.
|
|
|
Toymods member
I supported Toymods
Location:
Rydalmere, NSW
Registered:
May 2002
|
|
Re: 1999 Turbo RAV4 project...
|
Wed, 04 December 2002 15:30
|
|
Finally got pics of my two latest installs - the rear wiper arm and the new wheels and tyres.

The bottom wiper arm is from the Toyota Highlander, and as you can see, it's a lot thicker than the stock RAV4 arm.

The new wiper arm assembled and fitted onto the RAV4 (minus the rear wheel). There are two parts to the Highlander wiper arm, which snap together easily and can be dismantled too.

These photos may be a tad dark, but if you look and see the clearance between the edge of the wiper arm and the inside wall of the stock tyre, you'll see that there wasn't that much room to play with, but enough for the arm to make a full sweep if it was start-positioned at the bottom of the right side of the rear windscreen.

My new wheels and tyres. A very well-matched selection of rim 'n rubber for the RAV4. Replaced the stock sizing 215/70 R16 setup for the 255/50 R17 setup, and a well-matched combo it is with this new 17" wheel.

As you'd see the rims from the side - a marked improvement over stock. Aren't I a nice guy?? I took this picture purposely so you Photo-Chop freaks could make what you wanted of the wheels on my RAV4, so long as they stay within this site.

A rather pretty sight on the rear end, nice for the drivers driving behind you to be dazed by the splendour of the chrome wheel.

The RAV4 in it's home, displaying it's blue and purple, especially the front-left disc brake caliper.

An obscure angle of the RAV4, with the obligatory RAV4World.com sticker on display.

I can imagine what the lower bodykit will look like now with these new wheels and tyres - a lot clearer vision now...

An up-close look at the treads of the Bridgestone D-680 Dueler HP. Semi-aggressive design and very water-dispersant too. I had to put in three 10mm nuts to sit on the threads of the wheel carrier BEFORE the wheel went on, so the wiper arm from the Highlander had enough clearance to make a full sweep. Unfortunately the rear wiper arm will never inherit it's old traits of starting and finishing it's sweep on an angle, but it's sufficient enough for me to look out of the rear windscreen, which is what is important. Since then, I've had a plate made up out of alloy, roughly the same size as the inside-face-diameter of the new wheel (about 6" across) and 10 mm thick, which replaced the individual nuts and made the spare wheel a bit more comfortable in it's place. A future modification will be to have the wheel carrier painted Royal Plum Pearl (the same as the rear spoiler), instead of the dull, boring matt-black it is currently.
More on the next post....
[Updated on: Wed, 04 December 2002 15:37]
|
|
|
Toymods member
I supported Toymods
Location:
Rydalmere, NSW
Registered:
May 2002
|
|
Re: 1999 Turbo RAV4 project...
|
Wed, 04 December 2002 15:33
|
|
From last post...

Finally, the monolithic stance of the RAV4 against a sunflare. I want to get this pic blown up and hung on my wall, I think it's that good.
Please give feedback as to what you think of my modifications up till now.
Cheers guys!
|
|
|
Toymods member
I supported Toymods
Location:
Rydalmere, NSW
Registered:
May 2002
|
|
Re: 1999 Turbo RAV4 project...
|
Wed, 12 February 2003 17:27
|
|
The project is coming along nicely... slowly, but nicely.
I've had my undercar neon kit installed and it looks great. I only have tubes on the sides for now, but when the front and back parts of the bodykit are fitted, I'll probably put some more tubes on those respective areas too.
More plans for this project are upgraded seats and engineering, a bit more paintwork, a dashboard kit (brushed aluminium), leather steering wheel & bosskit, window tint, upgraded rotors and pads, and maybe even some upgraded swaybars for the front and rear.
Some photos to come soon.
|
|
|

Location:
Castle Hill, Sydney
Registered:
January 2003
|
|
Re: Andrew's 1999 Turbo RAV4 project...
|
Sat, 15 February 2003 03:22
|
|
Man your car looks hot!!
love the work you've done to it. best rav4 iv seen in a
long time
cant wait to see it with the body kit!
|
|
|
Toymods member
I supported Toymods
Location:
Rydalmere, NSW
Registered:
May 2002
|
|
Re: Andrew's 1999 Turbo RAV4 project...
|
Sat, 15 February 2003 03:31
|
|
|
Thanks mate - just wait until the interior gets cranked-up. I already have designs on what it will look like. I'm planning on ditching the rear seats and converting it to a two-seater RAV4, while some other goodies will be occupying the rest of the floor area in the cargo bay (I think a false-floor is in the equation. ) The seats are getting swapped out in the front, and I still have to get a new base-frame made up (engineered) and certified-legal for both of the front's. New steering wheel and bosskit is next on the agenda however, closely followed by a rather expensive dash-kit.
|
|
|

Location:
Sydney
Registered:
January 2003
|
|
|
Toymods member
I supported Toymods
Location:
Rydalmere, NSW
Registered:
May 2002
|
|
Re: Andrew's 1999 Turbo RAV4 project...
|
Thu, 20 February 2003 14:55
|
|
Thanks dude... appreciate it. I just hope it makes a 'professional' show or two this year. 
|
|
|
Location:
sydney
Registered:
December 2002
|
|
Re: Andrew's 1999 Turbo RAV4 project...
|
Fri, 21 February 2003 06:53
|
|
did any one see the yellow one of these that the ultimate suspension built. number plates on it were "rav4" had sprintex supercharger, gt4 bonnet scoop and shit they spent over 100 grand on it leather interior twin sunroofs the list went on.
it was a great looking little car until some tick turd stole it and burnt the bloody thing to the ground
|
|
|
Club Member
Location:
Sydney, NSW
Registered:
May 2002
|
|
Re: Andrew's 1999 Turbo RAV4 project...
|
Sat, 22 February 2003 01:15
|
|
I think I know that yellow one... Fark, it got torched??? I reckon that that is the worst way to die... You can't salvage it at all, you would lose everything...
What about the CRYPT Rav 4... That got slammed in the side by a Semi that ran a red light... It was farked... Like totally...
|
|
|
Toymods member
I supported Toymods
Location:
Rydalmere, NSW
Registered:
May 2002
|
|
Re: Andrew's 1999 Turbo RAV4 project...
|
Sat, 22 February 2003 12:21
|
|
So are there any other RAV4's around of showcar quality?
I have an advantage of living in a low-crime area for one, and two there's no traffic lights up here, so I think I'm looking pretty good considering the past trend.
It's a shame to see ANY car (especially a RAV4) get torched by some jealous wanker, or T-bone'd by an ignorant truckie. 
|
|
|
Toymods member
I supported Toymods
Location:
Rydalmere, NSW
Registered:
May 2002
|
|
|
Toymods member
I supported Toymods
Location:
Rydalmere, NSW
Registered:
May 2002
|
|
Re: Andrew's 1999 Turbo RAV4 project...
|
Thu, 06 March 2003 15:22
|
|
(From last post...)

The lower-centre console has seen some change of late... a missile switch and an LED activation/warning light (good for reminding you when the cops are about ) But what does it do??

Aha! This is what it does. Turns on the under-car neon kit I had installed a couple of months back. It's hooked up to battery power, not ignition (good for shows), and only has a 400mA (milli-amp) current draw from the battery, so it's ok to leave it on for a little while, but not too long. For those wondering why this pic is upside-down, it's because that's the way it was taken. Flat on my back, struggling to get under the sidestep to snap a shot of the neon's in action. This is why you only see three of the installed four neons under the sidesteps.

And the end result? I'll let you be the judge. Please, as always, feedback is more than welcome. Next time I update this page hopefully I'll have a digital camera with me, so no more dashing down to get photos developed, bringing them back, scanning them, uploading, etc.
PS: Don't worry about what that is on the floor of the garage - it's only water.
Planned mods for the next time I update this page:
Steering wheel and bosskit install

Quick-shift for RAV4 installation

Seats installed (maybe, not definite)
Enjoy.
[Updated on: Sun, 20 April 2003 07:49]
|
|
|
Toymods member
I supported Toymods
Location:
Rydalmere, NSW
Registered:
May 2002
|
|
Re: Andrew's 1999 Turbo RAV4 project...
|
Thu, 06 March 2003 15:28
|
|
The secret's out... my project has it's name.

If you see me driving around somewhere in Sydney and you see this plate on my car, be sure to give me a toot.
|
|
|
Club Member
Location:
Sydney, NSW
Registered:
May 2002
|
|
Re: Andrew's 1999 Turbo RAV4 project...
|
Sun, 09 March 2003 11:13
|
|
Nice plates dude...
But whereabouts in Sydney will we see these plates???
|
|
|
Toymods member
I supported Toymods
Location:
Rydalmere, NSW
Registered:
May 2002
|
|
Re: Andrew's 1999 Turbo RAV4 project...
|
Sun, 09 March 2003 11:50
|
|
|
Umm, almost anywhere - from Miranda to Minchinbury. Just keep an eye out for them - I'm bound to show up anywhere. When is the next 'meet' as such, in the next couple of weeks??
|
|
|
Club Member
Location:
Sydney, NSW
Registered:
May 2002
|
|
Re: Andrew's 1999 Turbo RAV4 project...
|
Mon, 10 March 2003 06:43
|
|
|
I believe the next meet is the Drive-Ins this Saturday night at Blacktown... Check the Events thread for more info dude...
|
|
|
Toymods member
I supported Toymods
Location:
Rydalmere, NSW
Registered:
May 2002
|
|
Re: Andrew's 1999 Turbo RAV4 project...
|
Sun, 23 March 2003 16:03
|
|
Rear Suspension Corrected!
Finally after more than a year of looking like my RAV4 has it's rear end jacked-up, I got along to some guys I know that did the suspension for my last ride.
They first observed the telescopic thread of the left-rear was bent, so they straightened this up. Also they noticed that the rear shocks were the wrong types used for my application (about 60mm longer than what was supposed to be used). I have the rear shocks off the 3-door model instead of the 5-door.
Then they had a look at the rear springs and decided that the best option wasn't to reset them, but to replace them with something lower than what was on there. The King Springs they totally dissed, put them aside and got some Jumbo's in there instead (fresh out of the furnace). I then broke them in by getting into the RAV4, reversing out and slamming on the brakes. This helps the springs 'bed-in and set' properly. After doing this a few times, I had a look at the sidesteps (using this a my level-guide) and noticed they were level with the ground. Yahoo!! Finally my rear suspension height was fixed. The lowered King springs were 30mm lower than stock, and the new Jumbo's were 1Œ" lower than that (or 30mm also), so the overall lowering is now 60mm below stock. Handles like a dream too.
The total cost of fixing up this rear-end was $145. Pretty sweet-sounding to me.
Later on (at night-time) I also noticed that people were flashing me coming from the other direction. This is because when you adjust the suspension, the light beams have to be adjusted as well.
|
|
|
Location:
nsw
Registered:
May 2002
|
|
Re: Andrew's 1999 Turbo RAV4 project...
|
Mon, 14 April 2003 05:14
|
|
|
he he he, i had that prob as well, damm headlights, man thats a sweet rav4, i love the calipars, so whats happenin wid da ttuuuurrrrbbbbboooo ?
|
|
|
Toymods member
I supported Toymods
Location:
Rydalmere, NSW
Registered:
May 2002
|
|
Re: Andrew's 1999 Turbo RAV4 project...
|
Mon, 14 April 2003 15:20
|
|
I'm looking at a fully certified and emissions-tested 3S-GTE front-cut transplant out of a Group-A GT-Four.  This will cost about $9000 to do all-totalled (that's take out the old donk and gearbox, new clutch, machine & balance flywheel, drop in the 3S-GTE with about 80,000 on it, and the gearbox, short-shift kit, EBC, install 3 new interior gauges, etc. This will cost about $9000 to do all-totalled (that's take out the old donk and gearbox, new clutch, machine & balance flywheel, drop in the 3S-GTE with about 80,000 on it, and the gearbox, short-shift kit, EBC, install 3 new interior gauges, etc.
After that I'll be looking at doing the lower bodykit. Everything that you see that's dark-grey coloured, is getting fibreglass-moulded without the annoying-looking divot lines in the plastic along the sides, and a bit of a transformation job for the front and rear bumpers.
But for now, I'm waiting on my new steering wheel and front discs & pads to arrive.
|
|
|

Location:
Sydney (Liverpool)
Registered:
March 2003
|
|
Re: Andrew's 1999 Turbo RAV4 project...
|
Tue, 15 April 2003 10:44
|
|
I think seeing as though the back of the RAV4 has been dropped a bit the angle of the headlight beams would have risen about the same amount. Before the front of the RAV4 would have been facing more toward the ground and the headlight beams would have been set for that angle but now that you've changed that angle the beams would be shining higher then they should.
That's just my theory anyway.
|
|
|
Toymods member
I supported Toymods
Location:
Rydalmere, NSW
Registered:
May 2002
|
|
Re: Andrew's 1999 Turbo RAV4 project...
|
Sun, 20 April 2003 07:58
|
|
| Juggalo wrote on Tue, 15 April 2003 20:44 |
I think seeing as though the back of the RAV4 has been dropped a bit the angle of the headlight beams would have risen about the same amount. Before the front of the RAV4 would have been facing more toward the ground and the headlight beams would have been set for that angle but now that you've changed that angle the beams would be shining higher then they should.
That's just my theory anyway.
|
Right on... that's why my beams were angled downwards about half a turn each.
|
|
|
Toymods member
I supported Toymods
Location:
Rydalmere, NSW
Registered:
May 2002
|
|
Re: Andrew's 1999 Turbo RAV4 project...
|
Sun, 20 April 2003 09:23
|
|
After the last meet (the Easter egg hunt/car rally, etc.), I went over to Burwood to get my new steering wheel that's been on order for a number of weeks. I found out that the wheel I was looking for originally had been discontinued  , so I got this one instead... , so I got this one instead...

This will serve a better purpose and go with the theme of the car a lot better, once it's revealed under an ultra-violet light (or black-light). Now I'll have to find a steering wheel puller to get the old wheel off and eventually put the new bosskit and wheel on. Before it goes on, I'm going to see if the centre piece (aluminium, I think) can be anodised for a more unique look. This is already a unique wheel, as it's only 1 of 2 of these wheel (of this colour) in Australia. The guy that sold me the wheel is the owner of the other wheel like this.
I'm hoping to have this installed by the time the ANZAC Day ToyMods cruise comes around, although it's unlikely.
|
|
|
Toymods member
I supported Toymods
Location:
Rydalmere, NSW
Registered:
May 2002
|
|
Re: Andrew's 1999 Turbo RAV4 project...
|
Mon, 05 May 2003 16:11
|
|
Ok I'm gathering most people here would know how to change over a steering wheel (since this IS a club for the modifiers of Toyota's), but if you want more detailed pics of the install, please either email me or PM me.
I sent the centre disc of the wheel to get anodised and got it back last week. This is how you put this complicated contraption together...

Start off with the centre disc (originally the silver aluminium colour)

Put the chrome fangs into the slots in the disc, tighten with grubscrews in the back of the disc

Sit the fangs into the slots provided in the bottom of the wheel. At this point the disc will line up with the holes in the steering wheel frame that it sits on. Bolt up the disc to the frame via the back of the frame.

Sit the horn button into the centre hole

The polished aluminium ring sits on top of the horn button, flush with the rest of the face of the wheel.

What it looks like in the car.
Soon to come - UV lights (or blacklights) installed into the interior, lighting-up the front of the RAV.
More pics coming soon...
|
|
|
Location:
Castle Hill, Sydney
Registered:
January 2003
|
|
Re: Andrew's 1999 Turbo RAV4 project...
|
Tue, 06 May 2003 02:47
|
|
Yeh that S W looks awesome!!
how did that set you back? im looking at getting one for my car soon.
|
|
|
Toymods member
I supported Toymods
Location:
Rydalmere, NSW
Registered:
May 2002
|
|
Re: Andrew's 1999 Turbo RAV4 project...
|
Tue, 20 May 2003 17:27
|
|
Today it was time to install the quickshifter that recently arrived from the US. This was by far the trickiest install I've had a hand in doing so far. It's fairly obvious that this shifter was designed for JDM and/or USDM RAV4's, as the diagram provided in the box clearly displays a gearstick assembly completely unlike mine, probably metal, hence why most of the parts for the job weren't used. The design of the assembly or picture breakdown LOOKS the same as mine, but my gearstick assembly is made of a type of plastic instead, and no demountable top-section in which to put spacers for the bottom section of the shift to have adequate clearance.
Anyway, to better explain, I took detailed photos of the install.

The original gearstick assembly, minus the removable part of the lower console - the wires you see coming from this section are for the neon kit under the car, and the LED for the activation of the neon's.

With the console removed, everything was fairly easy to get to.

After removing the lower console completely (5 screws), the gearstick housing assembly is visible. These may differ from country to country. My gear housing and mechanisms are a type of hardened plastic, whereas others could be made of metal, and disassemble into more parts than mine.

Dismantling the assembly was a tad trickier than first thought. My sister's husband (Rob) helped me out with most of this installation, and here his help was invaluable. It turns out that instead of nuts held on by threaded bolts (as depicted in the instructions), the parts that hold the top of the shifter in place have a bolt with a pressure-washer (slots cut out of the washer itself, the hole designed to be smaller than the bolt that it fits on so when it gets pushed on, it sits on it with adequate pressure holding it in). We had to find a way of removing these washers without destroying them, and two small, flat-bladed screwdrivers and a lot of careful prying did the trick.

We decided that since we couldn't effectively get these two bolts holding the top part of the shifter in, out of the assembly while still in the car, we removed the 4 x 12mm hex-headed bolts that hold the assembly to the transmission tunnel. First remove the U-shaped wedges (brass) that hold in the cables for the shifter. After this, gently remove the cables and slide the assembly out.

The only way we could remove these bolts enough to get the top portion of the assembly out, was to do it by force. Being a plastic substance, a vice doesn't usually agree with the assembly, so we had to position the assembly in such a way that we were trying to remove these rather stubborn bolts, but not damaging them. The only way to do it was the same way as before - with the two screwdrivers and a bit of prying. Eventually we got this part sorted, and used a hammer and a centre-punch to get the bolts out of the assembly.

The green arrows represent the direction in which the bolts had to be removed in order to free the top section, marked in red.

Here are the differences between the two shifters. As you can see, the pivot point (or the thing that looks like a silver ball on the gearstick) is positioned higher than the stock stick. The white thing to the right of the pic is the housing for the pivot, which turned out to be too small for the assembly I had. The holes were out of alignment by at least 7mm. To overcome this, we decided to use the stock pivot housing with the quickshifter.

Because the mounting spacers that were provided (aluminium) were no good to me, and there was nowhere I could use them, the tail end of the shifter, or the bottom point that is a long tapered area below the pivot, was going to hit the transmission tunnel. We had to improvise somewhere, and the mounting points on all 4 bolts looked to be a good place to do it. We used 3/8" nuts that were 8mm high, and placed the assembly on top of these.

The nuts installed under the gearstick assembly.
Continued next post....
|
|
|
Toymods member
I supported Toymods
Location:
Rydalmere, NSW
Registered:
May 2002
|
|
Re: Andrew's 1999 Turbo RAV4 project...
|
Tue, 20 May 2003 17:31
|
|

The green arrow indicates the amount of space we had to play with once the nuts were installed under the gearstick assembly. As you can see, there's 2/5th's of bugger-all room to play with there, but just enough to shift without hitting the transmission tunnel.

The installation of the quickshifter. Now everything is in place and we can start working on the æsthetics and functionality of the stick a bit more.

We measured out the best place to put the mounting adapter for the gearknob (that silver looking collar on the stick, with the grubscrews hanging out of it), and marked the stick above the knob mount for cutting.

I wanted to have a shorter gearstick so my leg didn't keep on hitting it once it was in 5th gear. To do this, we got a piece of cardboard and poked through the top of the quickshifter to the point where it was going to be cut. We cut about 49mm off the stick, and yes that included the threaded portion too. This wasn't needed - and I'll tell you why shortly.

I cut the original purple anodised garnish basically in half, and decided that if it was going to work out, then I had to give it my best guestimate. Take a close look at this pic - seen Star Wars: Episode II? Remember Master Wundo (Samuel L. Jackson)? I loved that purple light sabre. The flash effect going through the garnish makes it look kind of like that light sabre.

We cut the top off the new shifter and located the purple garnish on some tape, stuck to the new shifter. Once this was in place, we fitted the threaded gearknob adapter on top of the garnish. The reason why I don't need the threaded part of the gearstick is because I'm not using it. The thickness of the quickshifter's shaft is almost precisely that of the internal diameter of the gearknob adapter, meaning that it doesn't need a plastic sleeve for the grubscrews to adapt to it, like it did before. One thing we DID have to do is file out sections of the stick for where the grubscrews would bite into the quickshifter. If these hadn't been done, then the gearknob would not sit in place. The grubscrews go through the gearknob adapting thread, so if they poke out at all, the gearknob won't screw down all the way.

Replace the lower console (with the aluminium surround already attached, and the gearboot on the surround), put the 5 screws back in their places, ash tray, wiring for neons and switches, etc... put the gearknob onto the adapter nice and tight, and VOILA!! It's complete.
Total time taken to do this portion of the project: About 5 hours (this includes all the necessary head-scratching, swearing, cursing, trying to decipher Japanese instructions, etc.) For a JDM RAV4, this would probably take about an hour to do.
The end result is a much sportier feel and a whole new learning process on how to work with a quickshifter. It's very stiff, virtually no play in the gears, and makes for a very interesting time of trying to double-clutch through gears. For a JDM RAV4, it's probably 30% shorter throws through the gears, but mine feels like about 50% shorter. This is probably because I cut the shifter to the size I wanted too.
Enjoy - hope you all like it.
|
|
|
Toymods member
I supported Toymods
Location:
Rydalmere, NSW
Registered:
May 2002
|
|
Re: Andrew's 1999 Turbo RAV4 project...
|
Tue, 20 May 2003 17:40
|
|
I have a couple of extra pics to show for this thread.

The TRD quickshifter in place, rather short but fully-functional....

I purchased this badge a while back, but didn't want to put it on until I had something to show for it. Now the quickshifter is installed, I wear the TRD badge with pride.
More mods to come soon include:
Bonnet strut installation
K&N pod filter and CAI install
BTW, Scott... on my last mod (to answer your question), the steering wheel cost $400 and the anodising cost $40.
|
|
|
Location:
Castle Hill, Sydney
Registered:
January 2003
|
|
Re: Andrew's 1999 Turbo RAV4 project...
|
Wed, 21 May 2003 02:15
|
|
looks real good man! i love the quick shifter, im looking at getting one myself.
p.s: love the TRD badge aswell
|
|
|
Toymods member
I supported Toymods
Location:
Rydalmere, NSW
Registered:
May 2002
|
|
Re: Andrew's 1999 Turbo RAV4 project...
|
Tue, 10 June 2003 16:39
|
|
I had the cold air intake (CAI) installed last weekend, took a lot of photos, but I'll post the necessary ones.

Had a custom-made 3" diameter pipe made and a 2.5" reducer on the throttle body side. A mid-grade silicone joiner holds the pipe where it is.

Drawing up of the heatshield template and cutting/sizing to shape for the engine bay.

After the cardboard layout was transferred onto the stainless sheet, it was jigsaw-cut and holesawed, then filed.

The sheet was then bent into shape and trial-fitted into it's position.

A couple of attaching points were made, a bracket fitted to the back and some rubber lining around the filter hole, before the pipe and filter were re-fitted.

The CAI install as it looks now, complete with rubber-stripping around the top edges of the heatshield and of course, the K&N sticker.
I'm hoping to get the last part of the CAI project done sometime this month - involves a NACA duct and 3" tubing from the splashtray.
A big thankyou to Hi-Octane Racing / Performance Metalcraft at Rydalmere for doing an outstanding job on both the CAI alum pipe and the heatshield.
|
|
|
Location:
Castle Hill, Sydney
Registered:
January 2003
|
|
Re: Andrew's 1999 Turbo RAV4 project...
|
Wed, 11 June 2003 03:08
|
|
Like it alot
Couple of questions... What metal did you use for the heat shield? and 2) what did you use to bend the metal into such straight lines?
|
|
|
Toymods member
I supported Toymods
Location:
Rydalmere, NSW
Registered:
May 2002
|
|
Re: Andrew's 1999 Turbo RAV4 project...
|
Wed, 11 June 2003 13:27
|
|
Answers...
The heatshield was made out of 2.5mm thick mirror-finish aluminium, and it was bent using a metal press/bender. I didn't make it up, I just wanted it made to how I thought it would sit the best for it's up-coming modifications. The guys at Performance Metalcraft in Rydalmere did the job on both the new intake pipe (which sounds so mean compared to stock, and has actually scared and/or surprised a couple of people when I stab the pedal). They did a great job with the TIG welding. Made the template design and trial-fitting look like child's-play. These guys do mostly Nissan Skyline's and more professional work for some V8 Supercars.
Beware if you go to these guys though - if you want a professional job, you'll get it - but at the professional price too.
|
|
|
Toymods member
I supported Toymods
Location:
Rydalmere, NSW
Registered:
May 2002
|
|
Re: Andrew's 1999 Turbo RAV4 project...
|
Mon, 16 June 2003 16:05
|
|
Got the seats for the RAV4 last week. Here's a look at the Monza 633 series front seats...

I also have seat rails for these seats, but I have to have sub-frames made up for them. To get this done without an engineer's certificate will be the interesting part.
I'll post some pics when these are installed.
|
|
|
Toymods member
I supported Toymods
Location:
Rydalmere, NSW
Registered:
May 2002
|
|
Re: Andrew's 1999 Turbo RAV4 project...
|
Mon, 30 June 2003 14:04
|
|
Me again...
Finally paid off the new front rotors and got some new pads for the front end as well. These rotors aren't cheap as you'd expect, being DBA Longlife Gold quality. Those that went to the DBA factory tour (that I wanted to go to as well ) would have seen these on the tour. I got Bendix Performax front pads to go on as well, and I got some Toyota rear disc pads which I'm not sure will go on or will have to be returned - there looks to be a fair bit of meat still on them, but I want to check out the inside of the pads before I make a decision on that.
Here's the discs....


I get these installed today, and I'll post up pics of how they look after the install.
|
|
|
Location:
Central Coast
Registered:
March 2003
|
|
Re: Andrew's 1999 Turbo RAV4 project...
|
Tue, 01 July 2003 00:40
|
|
|
Just thought you might wanna know the BOMEX do an awsome bodykit for this shape RAV4. Im not sure what site I seen the kit on though so you might have to just do a search for it.
|
|
|
Toymods member
I supported Toymods
Location:
Rydalmere, NSW
Registered:
May 2002
|
|
Re: Andrew's 1999 Turbo RAV4 project...
|
Tue, 01 July 2003 13:10
|
|
|
Yeah, it's called http://www.bomexaero.com/ and one of the guys on the RAV4World.com forums (Mike) has this kit on his ride. I believe his car was sponsored by Bomex USA. I've seen quite a few nice Bomex kits on RAV4's over in the northern hemisphere, Japan and the US typically, but no one in Australia is an authorised representative or dealer/installer of Bomex products yet. The Bomex kit isn't for me, with the front grille guard and the lights on and everything, besides the sidesteps that are already there too... my front bar is going to be modelled off the Bomex bar, with no sideskirts, and a different rear-end installed. I want to see if I can actually have a bumper put on the rear, as the RAV4's of ALL generations are sorely lacking in this area. The only thing they do have is a spare tyre there. I will, however, be adopting the Bomex front grille as soon as I can get the guy to ship it here.
|
|
|
Toymods member
I supported Toymods
Location:
Rydalmere, NSW
Registered:
May 2002
|
|
Re: Andrew's 1999 Turbo RAV4 project...
|
Tue, 01 July 2003 13:11
|
|
|
She got broken-into today, nothing too major, but friggin annoying. The front passenger door glass had to be replaced (they smashed that in to gain entry), tool box, torch, gear knob minus the threaded section (useless to them), but what got me the most is the new disc rotors for the front were in there too, as well as the brake pads for all four corners. I'm thinking I was watched as I put these in my car last night. Arseholes... insurance won't help me out, it costs $1000 in excesses for a claim.. An alarm has suddenly hit the top of the priority list. Too bad it wasn't sooner... like shutting the gate after the horse has bolted.
|
|
|
Location:
Castle Hill, Sydney
Registered:
January 2003
|
|
Re: Andrew's 1999 Turbo RAV4 project...
|
Wed, 02 July 2003 01:30
|
|
man thats some bad news
sorry to here it.
Find out who they are and break their legs
|
|
|
Toymods member
I supported Toymods
Location:
Rydalmere, NSW
Registered:
May 2002
|
|
|
Location:
Epping, Sydney
Registered:
April 2003
|
|
Re: Andrew's 1999 Turbo RAV4 project...
|
Wed, 02 July 2003 02:34
|
|
|
that sux BIG TIME dude, I am so sorry to hear that. You need a bounty hunter...
|
|
|
| Current Time:
Mon Jun 8 20:09:39 UTC 2026 |
Total time taken to generate the page: 0.012068033218384 seconds |