| Author | Topic |
|---|

Location:
S.E suberbs, Vic
Registered:
December 2003
|
|
Project 86 - Big technical worklog with 20V + diff + brake + suspension conversion
|
 Sat, 26 February 2005 13:30

|
 |
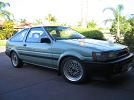
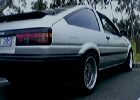
By request I am going to post some of the mods on my Sprinter. Due to the huge amount of them I will probably just put a before/after or just a finished pic of each mod. If someone would like to see more pics or have any questions please let me know. I am happy to answer them on here regarding what i have done or anything else. But before anything else heres what my machine looked like last time I took a pic:

Anyway heres the specs that I currently have planning to have:
Engine: Toyota 4AGE 20 Valve Silver top
Clutch/flywheel: 20V flywheel and exedy 212mm clutch
Planned Induction: Factory quad-throttle bodies, custom made inlet trumpets with a custom airbox sucking through a K&N pod filter
Gearbox: T50 with custom short shifter
Planned gearbox mods: Installation of an oversized Delrin Shift Bushing and also a change of gear knob.
Diff: T-18 with disks with 1 : 4.1 TA-22 diff gears
Planned Diff: Current T-18 with TRD 2-way LSD center. With also custom stroke limiting rods.
Radiator/fans: Hyundai Excel with modifed hyundai mounts and one of the two OEM fans, which is the former air-con condesor one.
Front shocks: ST-204 4-way externally adjustables by KYB: AGX
Rear shocks: Commodor IRS 8-way externally adjustables by KYB: AGX
Front Springs: Kings 65mm I.D coilover type, 325 pounds/inch (5.8 Kg/mm) 180mm long, Linear spring
Rear Springs: Custom kings, 70mm lower than standard, approx 180 pounds/inch (3.2Kg/mm), progressive spring.
Front Brakes: MK2 Supra vented 260mm
Front Brake Pads: QFM organic sport pads
Rear Brakes: ST-141 280mm disks with AE-82 corolla calipers.
Pan-hard Rod: Custom made adjustable
Exhaust manafold: custom made stainless true equal length and equal diameter extractors, 4 to 2 to 1. 50cm primaries and half length secondaries.
Planned Exhaust: fully deburred, mandrel formed, stainless steel system which is 2 1/4 inch. Middle metal cat that leads to an angled straight through stainless muffler with a chrome tip.
Ignition: OEM 4AGE 20V ECU in conjuction with modifed loom and custom waste spark ignition.
Planned ignition (second stage): 2 x Twin channel M&W ignitor modules with individual coil packs for each cylender.
Coils type: Hyundai Excel OEM
ECU: OEM 4AGE 20V ECU in conjuction with modified loom.
Planned ECU (second stage): Wolf 3d 3.1 (already have)
Stereo:
Heat-unit: Clarion MP3
Front speakers: Jaycar response 4 inch
Front Tweeters: Ex OEM
Rear speakers: Alpine 6 x 9s
Amp (sub only): Cadence
Sub-woofer: Reactor
Woofer enclousure: Custom
Other bits: Composite parcel shelf and fader control adapter to be woofer level control.
Also lastly I have copied most of this from another forum so if something doesnt quite make sense this is why.
[Updated on: Tue, 11 October 2005 08:25]
|
|
|
Location:
S.E suberbs, Vic
Registered:
December 2003
|
|
|
Location:
S.E suberbs, Vic
Registered:
December 2003
|
|
|
Location:
S.E suberbs, Vic
Registered:
December 2003
|
|
Re: Project 86
|
Sat, 26 February 2005 13:40

|
|
UPDATE: This was for when I was aiming to have a 4AGZE turbo hence the large pipe size, this is now very regretfully for sale.
Over the last few days there has been a strike with a picket line at my work which I was expected to be on, so what do I do? work on my car of course! Anyway I started by moving my original exhaust so it doesnt cross over from one side to the other and also so that it finishes before my diff. This leaves the other side completely free and allows my new exhuast to be fitted all the way to the back of the car. It starts as a 3 inch pipe and just before the diff it reduces down to 2.5 inch, all stainless, all equal length diameter bends and with no burrs or steps or intrusive welds.
It took me like 3 days of tedious work but heres what I ended up with:

thats the 3 inch flex pipe at the front which I am hoping wont melt as I am expecting for part of this exhuast to start glowing red at times.

Heres after it has reduced to 2.5 inch where it goes up and over the diff, this part alone took me so many hours. That handbrake cable will obviously need to be held well away.

Taken out of car, notice the reduction in pipe size, although it looks bad on the outside the inside is nice and smooth and ontop has been ground and sanded for even better flow. On the end of this pipe is where I plan to attach my 2.5 inch stainless magnum stainless straight through muffler. If theres wasnt a turbo at the start of this it would be unbearably loud.

A view from the inside, notice how theres a pair of grind marks on each join to match the pipes together, this is one of the reasons it took so long. As for the top while it looks like thres a step there there really isnt, its just an optical illusion.
I only tack welded it together for now, that because if I weld it fully not only will it be rough and potentially burn though it but it will also be gaurenteed to leave weld protrusions on the inside. So when I can I will be getting a friend to Tig weld everything together.
[Updated on: Thu, 17 November 2005 07:13]
|
|
|
Location:
S.E suberbs, Vic
Registered:
December 2003
|
|
Re: Project 86
|
Sat, 26 February 2005 13:46
|
|
I have to admit with this project that many times I have to ask myself if its worth it because it causes me stress often and it can be real frustrating to find information that I need amoungst all the crap, and trust me even amoung the Trueno fanatics they still speak alot of crap sometimes about certain things.
Anyway I have had yet another few setbacks, I have just found out by an engineer that my pipe when it reduces in size should have a taper of no more that 7 degrees, so no matter how much I have ground that part of it down smooth it has to come out and have something better put in. Anyway I am not going to tollerate such a compramise when I have spent so much time doing everything as perfect as I can so I have to do what I have to do, even if it takes half a day to make that one bloody adapter. The only way I can think of making something that fits that specs is to cut up a 3 inch pipe in two and carefully shape it into a taper, a long painfull and shitty job, never mind.
The other one is that my intercooler fits nice .. but with the inlet/outlet leaning on the subframe, so theres no way I can get some good piping to it. So much to my horror I will get my angle grinder out and rip into my new shiny cooler. I will chop the original 3 inch pipes off and probably replace them with a 90 degree 2.5 inch bend on either side higher up. This isnt bugging me so bad because now that I think about it it should be better in terms of smooth airflow. Just more hastle and money as I cant weld aluminium and no-one who owes me one does either.
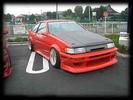
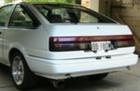
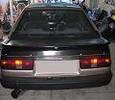
Lasty I should post a new pic of my car, I have a new number plate mount which holds it near the bottom drivers side of the front and I also chopped out the mounts and extra plastic where it used to go. This has done two things for me, firstly it has unblocked a large area for the airflow, secondly it makes it look heaps meaner. I will be chopping more supports out of the bumper to give a more clean look, I will have to put some mesh behind it in due time though to protect my intercooler. I have also been thinking about modifying my grill because I think it looks so damn boring and I have an idea on how to make it look mean, it will take some nerves though as they dont come cheap.
|
|
|
Location:
S.E suberbs, Vic
Registered:
December 2003
|
|
|
Location:
S.E suberbs, Vic
Registered:
December 2003
|
|
|
Location:
S.E suberbs, Vic
Registered:
December 2003
|
|
|
Location:
S.E suberbs, Vic
Registered:
December 2003
|
|
|
Location:
S.E suberbs, Vic
Registered:
December 2003
|
|
|
Location:
S.E suberbs, Vic
Registered:
December 2003
|
|
Re: Project 86
|
Sat, 26 February 2005 13:56
|
|
Today was another long day. i managed to fit my radiator and on the side rewire the power supply to my brothers fuel pump in his car.
The bottom hose had already been taken care of, but on the top the inlet of the radiator and the outlet of the water pump were different sizes. I did however notice that the hose from one very nicely slid over the other. So what I did first up is use part of the sprinter OEM hose for off the water pump and the Hyundai one off the radiator, I trimed them down untill they fitted together nicely with them overlapping each other i the middle. I was happy to find it fitted very nicely together. From here I choped off an aluminium peice of pipe and jammed in into my smaller pipe off the radiator, again with some assistance from my heatgun. Like so:

from here the larger hose slid over the top and the aluminium insert was used to provide a support for the hose clamp that held the two together. Besacuse I had to use the heatgun to put the incert in I wont ever have to worry about it moving around, it just in there way too tight.
After it had all been done up:

There, looking like it was made to be fitted that way!
I made the brackets that the Hyundai OEM radiator mounts will screw into. I welded them on and spray painted them from an expensive colour matched metalic spray can I had laying around. Also as per usual I used toyota OEM bolts to hold it down to further the original look and practicality. Heres how it looked:

Also notice how the oginal overlfow bottle hose on the top left looks like it was made to fit on.
Lastly a pic from the back showing how nice it fits:

I also started on my electrics and I am still working on that, I will show some pics when I have done it. I am still thinking of what method I am going to use on this, one thing for sure is that I will have individual relays for each fan, and its almost certain I will have a switch mounted next to them for the manual overide.
UPDATE: Since my change of plan to get a 20 Valve non turbo I have no need for such an excessive cooling system. I havn't bothered to wire the fans on this thing up yet and I have been driving for like 2 months as is. Only after sitting it traffic for ages does it slowly warm up a bit, and it really drops quick as soon as it gets some airflow. It really is amazing how well it works. Anyway my point is that this isn't necessary for my plans anymore and I have decided to take off the larger fan. Ones more than enough and with the larger one gone it will free up some room. I guess I will take another pic once I take it off.
[Updated on: Thu, 17 November 2005 07:48]
|
|
|
Location:
S.E suberbs, Vic
Registered:
December 2003
|
|
Re: Project 86 - Big worklog with heaps of pics
|
Sat, 26 February 2005 13:59
|
|
I picked up some parts today,
Rear shockers, notice the adjustable dial! Again in true tradition these arnt made for my car but instead an IRS Holden. They will need some custom mounts on my diff to fit but thats easy enough.

I also picked up an exhaust flange, some heavy duty Celica GT4 shocks for my front end and a complete set of springs for my friends Sprinter. He will be getting my current shockers.
Its been a while. Well I have had a drastic change of plans, it looks like I will sell my 4AGZE, my exhaust system, supra gearbox, intercooler and all assosiated accessories to do with forced induction. My plans have changed to fitting a 4AGE 20 valve with another one of my exhausts and intake that goes all the way through the radiator support to an air-filter that sits inbetween my radiator and bumper. It will be run by my Wolf EMS instead of the standard computer. Because its already a highly strung motor I would be happy to get 130Kw out of it, which is still awesome for an early 1.6L non turbo motor. I also plan to fit a lightweight flywheel, use the original driveline albeit with a heavy duty clutch. The N/A engine will let me keep the standard driveline which will let me keep the weight right down. I plan on having the finished wet weight to be under one ton.
The reasons for my drastic choice are many but the main one is the change in the focus of what I want to end up with. I am changing my aim from something that's awesome in a straight line and good around corners to something thats quick but beatable by some and a monster through corners.
[Updated on: Thu, 17 November 2005 07:52]
|
|
|
Location:
S.E suberbs, Vic
Registered:
December 2003
|
|
Re: Project 86 - Big worklog with heaps of pics
|
Sat, 26 February 2005 14:00
|
|
I installed my rear AGX shockers into my car. Heres how I did it:

This is the orginal design, an eyelet style with a bolt through the middle. The shockers I am fitting are almost identical with the exception of a 40mm shorter stroke and with a different bottom mount.

The Commodor used a realy primitive and stupid setup to hold the shocker in, its held in by one side only with a bolt thats aproximetly 13.5mm in the shank. To comensate for the pathetic design they used a big, heavy cast iron mount to fix it to. If that wasnt stupid enough they used a bolt with a rolled thread and a shocker that has a 15mm hole in it. So basicly all Commodors have heaps of slop in the lower mounts and rely on bolt tension to hold them captive. So what I did is get a spacer machined up which I pushed in. This is to reduce the diameter from the 15mm down to suit a common 10mm bolt. I decided to have a single bolt going right through.

Heres the deisgn I came up with, it uses 3mm plate. It uses a 10mm hex head bolt with a cylender shaped head. To stop any slop forming I welded a nut on one end and put a thick section of pipe to support the head at the other end. So I have the equivolent of about 10+ mm of material at either end of the bolt. Very simple, light and effective. In this photo I had chopped off the original mounts and was ready to weld mine on.

All welded up and painted. Looking here you see that I drilled 4 holes through the middle which I used to weld, I also welded from all the edges.

This is the top, the shocker was the same at the top however the bushes supplied with it were slightly different. Fitted into place the bushes show themself to be larger but it isn't a problem. To fit the covers I just pulled the inter peice of trim up a bit to clip them on. Once in place its indistinuishable.

All finished with the shockers mounted and ready to use.
Testing: It was a bit hard to test because I was experiencing front shocker problems at the time and I am using standard springs temporarily, however I found the new shockers to be awesome. From setting 1 it feels like a well worn standard sprinter item, to 8 where the whole car feels very well dampened. I recomend this to just about any sprinter driver who has the equiment to do it.
[Updated on: Thu, 17 November 2005 07:54]
|
|
|
Location:
S.E suberbs, Vic
Registered:
December 2003
|
|
|
Location:
S.E suberbs, Vic
Registered:
December 2003
|
|
Re: Project 86 - Big worklog with heaps of pics
|
Sat, 26 February 2005 14:01
|
|
I have had a bit of a setback, a pictures worth a thousand words:

I was happy to get my car running after having the suspension out for a while and I was out giving it a test run when I heard the engine sudenly make an ugly noise. I managed to limp home ok. After much cursing I eventually pulled the head off and found it had blown the gasket between the last two cylenders. I bought a gasket, put it in and put it back together. During a test drive it felt good (relativly speaking, its still a bloody 4Ac) but when I came back it was making a hissing sound. Looking at where it was leaking it apeared it was coming from where the coolant return pipe comes off the back of the head, crap! So now I am unsure what I will do. I am thinking of pulling the transmission out, because I have a spare and I want to try it out, so when I change it it will give me a good chance to get to that pipe, effectively hitting 2 birds with one stone.
My car is finally back on the road, but what a drama it was. I did end up taking the transmission out and I appled some gasket sealer to that pipe and also cut myself a gasket. Putting it back together it still leaked. So it was taken off again, fully scraped back to metal, cleaned up and ordinary silicone applied. It was bolted back up and it held tight, so much for the proper way. Anyway I decided to fit a spare T50 gearbox that I had that had ben sitting in the rain for atleast 4 years. So with Kev's (Phrostbyte) help we put it back in and connected it all up. Testing it out I realised it still needed some more work down, but the actual gearbox was in very good condition, which was fantastic, and no my spare T50 isnt for sale!
I also bought myself another steering wheel, so Kev will be getting my old one with an old boss kit i made a while ago. I will fit it as soon as I finish making the boss kit.
[Updated on: Thu, 17 November 2005 07:58]
|
|
|
Location:
S.E suberbs, Vic
Registered:
December 2003
|
|
|
Location:
S.E suberbs, Vic
Registered:
December 2003
|
|
|
Location:
S.E suberbs, Vic
Registered:
December 2003
|
|
|
Location:
S.E suberbs, Vic
Registered:
December 2003
|
|
|
Location:
S.E suberbs, Vic
Registered:
December 2003
|
|
|
Location:
S.E suberbs, Vic
Registered:
December 2003
|
|
|
Location:
S.E suberbs, Vic
Registered:
December 2003
|
|
|
Location:
S.E suberbs, Vic
Registered:
December 2003
|
|
|
Location:
S.E suberbs, Vic
Registered:
December 2003
|
|
Re: Project 86 - Big worklog with heaps of pics
|
Sat, 26 February 2005 14:16
|
|
A quick update as a few thigns have happened:
- I have to return my custom rear springs as they are 30mm off from the height I asked for, I like having a low car and its staying that way.
- I bought some ST-141 rear disks which are a huge 280mm diameter and also some some AE-82 twinky calipers to suit. They require some custom brackets to suit once again but I would think they would be easier than what it was for the front of my car. This will mean I will have 280mm disks all round but with vented on the front and solid on the back, total overkill but yeah thats me.
- I had some more braided lines made up, one brake line for my rear brakes and also a clutch line with a bango fitting on one end instead of standard. What this means it comes off the slave cylender at 90 degrees instead of straight on, this means its out of the way of the exhuast. I will have pics for this in due time.
- It looks like I will be rear suspension travel limiting devices in. I desperatly need something to keep my rear springs captive as right now the chopped OEM ones are very loose as it is and the custom springs I am getting have the possibilty of falling right out of my car. Seeing I am making my car safer than factory I am going to make a setup that limits the drop of the diff. It looks like I will be using stainless rods mounted to the body with a slider on the diff housing. When the car body goes up past a point the nut on the bottom of the shaft catches the slider on the diff and lifts it. So tottaly captive springs and tottaly legal, perfect.
|
|
|
Location:
S.E suberbs, Vic
Registered:
December 2003
|
|
|
Location:
S.E suberbs, Vic
Registered:
December 2003
|
|
Re: Project 86 - Big worklog with heaps of pics
|
Sat, 26 February 2005 14:19
|
|
UPDATE: Now that I have finished this part I can say now that what I did below DID NOT work. The calipers hit the body but I will still show this in the interest of showing what else I did.
Well that asside this is how I setup my soon to be brake setup, I used the following:
* T-18 diff
* new ST142 180mm brake disks
* Ae-82 brake calipers (same as AE-92)
I did some work on my T-18 diff with good sucess. In the previous week I took the drum brakes bits off and then with some help pulled the axels out. So after taking it apart I ended up with this:

No drum assembly or mounts only the housing, axel and retainer plate. Next I took the old drum backing plate and chopped a peice of the center that is just a bit bigger than the housing, like so:

I need to put these peices back in as they are required to get the right spacing to all for the crush on the bearing, also in the pic is the shim that adds to the right thickness. After cleaning it up I put it back in with the shim and some gasket sealer and then bolted it back together. Heres how it turned out:

With a quick spray of black paint it looks factory, which is exactly the look I am after. From here I fitted the disk on and modified the ae-82 brake mounts to slide over the housing, which turned up to be an exceptionally easy job. Heres how it looked as a dummy run:

The cardboard is placed between the caliper and the round part of the disk for vertical spacing and the center punch that has been jamed in there manually puts the handbrake on to hold it in the right position. From here I did some tack welds to hold it in. Repeating the process again it turned out pretty good I think:

I am going to have to do get some new custom metal brake lines made up for the diff, which will be cheap and then I will do a dummy run in my car to see that all the clearences are ok. Only then will I do proper welds and bracing of the mounts. I probably should change my brake master cylender too, because this might cause the master to push so far that its goes past what its designed for and then leak.
I also put a rim that came off my Corolla onto the diff with the brakes installed and although the caliper is set so far back it only clears the rim by a single centimeter. I hope my Sprinter rims and also my spare wheel will fit over ok, they should though. Once on my car they should look very interesting indeed.
[Updated on: Thu, 17 November 2005 11:25]
|
|
|
Location:
S.E suberbs, Vic
Registered:
December 2003
|
|
|
Location:
S.E suberbs, Vic
Registered:
December 2003
|
|
|
Location:
S.E suberbs, Vic
Registered:
December 2003
|
|
Re: Project 86 - Big worklog with heaps of pics
|
Sat, 26 February 2005 14:29
|
|
Today I started making a tottaly new setup for the cooling that doesnt require any cross-over pipes, so basicly I have wasted my time so far, great! The information I got requires the use of a RWD water pump so I tried using a single cam one (4AC).
Anyway down to it: I took my stock water pump off and this is how it looked:

I found a spare pump sitting in my back yard in the weather, it had been there for many years, needless to say time hadent treated it well, heres it alongside the 20V one, notice how the 20V one has no provision for a thermostat (right):

I took it apart and found a huge black spider waiting for me, that found itself inbeded in the cracks of soles in my steel capped boots. I found a broken bolt which I drilled out out and tapped and I also disassembled the housing. From here I cleaned it up with some acid based mag wheel cleaner which worked wonders. I decided to get a new front assembly if this works out so I didnt clean it.

Once I took the top section off it fit nicely onto the engine:

After doing this I fitted the pulley off the 20V and I found I had a problem:

and that was that the pulleys didnt line up, I will consider my options from here, a custom pulley seems to be in order. I have been told though that theres 2 versions of shafts on this pump so I will see whats around.
[Updated on: Thu, 17 November 2005 13:34]
|
|
|
Location:
S.E suberbs, Vic
Registered:
December 2003
|
|
Re: Project 86 - Big worklog with heaps of pics
|
Sat, 26 February 2005 14:30
|
|
Also today I readjusted my front suspension, I raised the height of the front to make it oversteer less, as a bonus I can now roll a coke can under my car without it hitting the exhaust.
The result of my tweaks is that the car is now about 1.5 cm higher in the front and it still oversteers a bit but its much better. I can't wind it up more because I will lose too much turn in response. I hope to gain some of that back which I lost when I add some negative camber. Perhaps then i will be able to make it handle even more neutral and still have an as good turn in.
A downside though is that while I did it at a friends I was testing my car in a residential area (under the speed limit) and I upset one guy because I went a bit fast around a corner next to his house. I will be doing that stuff somewhere else from now on or during a time when theres no-one on the roads but me.
|
|
|
Location:
S.E suberbs, Vic
Registered:
December 2003
|
|
Re: Project 86 - Big worklog with heaps of pics
|
Sat, 26 February 2005 14:34
|
|
Heres some stuff I have worked on prior to this forum:

My custom center console. This car comes standard with a double din hole, or something close to it. So what I did is cut up a stainless plate to fit ontop, cut out the hole in the middle for the face and then covered it. I love the finish and its sturdy too. The way the head unit is held in is a different nighmare altogether. I might take a pic of that soon. I think I am going to have a P.H.D is fidely crap when I am done with this car.

This was put in my car when I was getting it ready for my turbo 4agze conversion, it's still there though and will be untill I get an oil-temp gauge to replace it. This is far from a standard mounting job too, the cup was from Speco and the gauge was from Autometer, both 2 5/8 but slightly different sizes, so it didnt fit. I ended up cutting a slot in the side and having a tiny bolt to clamp it to compensate. I also got a friend to tig weld a mount on I made and I had it painted. This is also light but very solidly mounted.
Next up is my "WTF was I thinking?" parcel shelf, a project that has collected dust for a while now, I will get back to this in due time. Here it is the strangest parcel shelf for a Sprinter ever!


I will soon also show my short shifter and revisit my parcel shelf for more work.
[Updated on: Thu, 17 November 2005 13:41]
|
|
|
Location:
S.E suberbs, Vic
Registered:
December 2003
|
|
|
Location:
S.E suberbs, Vic
Registered:
December 2003
|
|
Re: Project 86 - Big worklog with heaps of pics
|
Sat, 26 February 2005 14:43
|
|
Just a short update, I have been held up with my other car and other problems, add to that having another family member hog the garage for weeks.
So what I have done is to take the two belt tensioners off the block and all the cast iron mounts. I did not measure them but I am sure they weighed about 3+ kg together. In their place using a small peice of metal I made a simple looking mount that pivots the alternator from the bottom on the exhaust side down low. I am going to modify a simple 'pull and tighten' tensioner. I bought one of a ST-141 corona today that looks useable.
Other than that I have been do busy to do anything else.
|
|
|
Location:
perth
Registered:
October 2003
|
|
Re: Project 86 - Big worklog with heaps of pics
|
Sat, 26 February 2005 15:16
|
|
this is great, im sure gonna keep an eye on this space 
you are pretty handy too man - doing everything yourself
great work
|
|
|
Location:
S.E suberbs, Vic
Registered:
December 2003
|
|
Re: Project 86 - Big worklog with heaps of pics
|
Sat, 26 February 2005 15:29
|
|
thanks, your right I do do everything myself. In general people don't or can't make things to my standards, or its just too impractical/expensive to get it done elsewhere. The only things I have sent off is the alarm install. I tried and couldnt get it running so the guy found a few wires in the wrong spot (pathetic instructions!) and of course the window tint, I would never attempt that myself.
I am planning heaps still and if you wait long enough it will be all here. Some of the things I havent talked about are:
-Carbon fiber: I found out I can get carbon fiber cheaper than I was intially quoted and hence I will get some and try making some stuff with it.
-The finish of that parcel shelf- I have an idea how I can use it for a mould without wasting it. I might even use some carbon fiber to finish the shape.
-Cometics: nice and mild stuff like a front lip and side skirts from a factory levin
and of course heaps more
|
|
|
Location:
Newcastle
Registered:
June 2004
|
|
Re: Project 86 - Big worklog with heaps of pics
|
Sat, 26 February 2005 21:38
|
|
Thats an amazing amount of work.
Looks great.
Were will you be sourcing the carbon fibre from?
|
|
|
Location:
S.E suberbs, Vic
Registered:
December 2003
|
|
|

Location:
Sydney
Registered:
January 2003
|
|
Re: Project 86 - Big worklog with heaps of pics
|
Sat, 26 February 2005 23:19
|
|
|
Totally impressed with the way you are manafacturing everything yourself, looks awesome mate!
|
|
|

Club Member
Location:
sydney
Registered:
May 2002
|
|
Re: Project 86 - Big worklog with heaps of pics
|
Sat, 26 February 2005 23:28
|
|
try using a fwd pulley on the water pump, you might just find they line up 
|
|
|
Location:
S.E suberbs, Vic
Registered:
December 2003
|
|
|
Location:
Melbourne
Registered:
April 2003
|
|
Re: Project 86 - Big worklog with heaps of pics
|
Sun, 27 February 2005 01:05
|
|
|
good work mate, waiting for your car!
|
|
|
Location:
Adelaide
Registered:
January 2004
|
|
Re: Project 86 - Big worklog with heaps of pics
|
Sun, 27 February 2005 01:45
|
|
great work, lots of DIY. Nice and in depth explanation as to what u have done aswell.
cant wait to see it all finished
|
|
|

Location:
melb
Registered:
March 2004
|
|
Re: Project 86 - Big worklog with heaps of pics
|
Sun, 27 February 2005 04:46
|
|
u da man sam 
|
|
|
Location:
S.E suberbs, Vic
Registered:
December 2003
|
|
|
Location:
S.E suberbs, Vic
Registered:
December 2003
|
|
|
Location:
S.E suberbs, Vic
Registered:
December 2003
|
|
|
Location:
Oakleigh, Melbourne
Registered:
March 2004
|
|
Re: Project 86 - Big worklog with heaps of pics
|
Wed, 02 March 2005 06:38
|
|
Some people are just in a class of their own.
Sam is no exception. Keep it up man.
-Jay
|
|
|
Location:
S.E suberbs, Vic
Registered:
December 2003
|
|
Re: Project 86 - Big worklog with heaps of pics
|
Wed, 02 March 2005 07:52
|
|
whoa! thanks Jay, however if your impressed that easy then your totaly going to flip out if I get enough time to make some of the ideas I have. How does this sound for a warm up:
-A 12V industrial programmable controller running a variable length intake system with analogue feedback for optimum intake tuning for most of the rev range. The controller could also be programmed to do various other functions such as shift light control and so many others.
-Homemade composite bonnet with Cro-Mo pipe supports, I am aiming for under 5kg
Also with excentric dual linkage hinges to open the bonnet up and out of the way in a way that hasn't been done before, so I would have total access to the engine bay and also look very interesting.
and so many other ideas that I know are too eloborate or I will never have time to explore, but who knows what I will come up with in the long run.
Also an update:
- As part of a deal I did my RCAs are being machined for me and are in the middle of completeion, they will be 60mm.
- Also part of my deal I will have some lower control arms modified to be adjustable. This means I will have adjustable camber from the bottom not the top. I don't think having a spherical bush in the top suspension is a good idea and just about all but Noltec do this. This way I can keep my stock strut top.
- I am almost finished in me making a custom alterator bracket, I will finish it clean it up and take some pics soon. I still need to find a different belt though that's longer, anyone have any sujestions? is an air-con one longer?
|
|
|
I Supported Toymods
Location:
Perth
Registered:
May 2004
|
|
Re: Project 86 - Big worklog with heaps of pics
|
Thu, 03 March 2005 04:50
|
|
hmm every time i look up how ur project is going im always impressed....i just have a few questions
how is the custom diff going?
Do the brakes work fine or did u run into complications?
What size rims do you need to fit over those brakes?
What is that plate off that you have the calipers mounted onto?
And also
Would those t18 axles fit into a jdm disk end rear? Or are the drum brake ones different?
cheers mate
Adam
|
|
|
Location:
S.E suberbs, Vic
Registered:
December 2003
|
|
Re: Project 86 - Big worklog with heaps of pics
|
Thu, 03 March 2005 06:40
|
|
| Bobski wrote on Thu, 03 March 2005 15:50 |
hmm every time i look up how ur project is going im always impressed....i just have a few questions
how is the custom diff going?
Do the brakes work fine or did u run into complications?
What size rims do you need to fit over those brakes?
What is that plate off that you have the calipers mounted onto?
And also
Would those t18 axles fit into a jdm disk end rear? Or are the drum brake ones different?
cheers mate
Adam
|
Well I had issue with my second car so I had to take it off the road, so once I got rid of it in a blaze of glory I had to rely on my sprinter as a daily trasport. This is really bad because I can't do things like this diff practically because I have to have the car back on the road the next day. Add to this I havn't had access to a hoist for a month because it has been occupied. Anyway my diff still is one of my higher priorities right now and what I might do is to get my car back on the hoist, take the current diff out, do what I need to do with the brake mounts and then put the current diff back in so I can drive it still. I will need to do that about 3 to 4 times I think but it should only take about 20 min each way. Anyway I am looking for another daily driver so I wont have to do this sort of crap. Also I have been overwealmed with other things that have kept me away from my garage and they will bug me for a while yet. I am hoping to work on this diff in one months time, then I will see if this combo really works.
I tried my 14 inch rim on my diff and I found that because of the oversized disk and the fact that the caliper sits out a fair way it comes quite close to the inside of the rim. If it wasnt for the fact that the disks sit so far inwards then a 14 just wouldn't fit. However that's not to say all 14 inch rims fit, some rims have the recess to put the tyre on on the inside. Rims with a big dish almost always have this and I dont think those will clear the caliper.
One other thing that might cause some issues is that the hydraulic lines coming off the caliper leave off an awkward angle I will probably need an elbow or something to make it work. I will get custom metal lines made up for the rest though regardless.
I cheated when it came to finding a plate to mount the calipers on, all they are are the original AE-82 Corolla ones with the steel dust covers removed, i found to my pleasant suprise that all I had to do was cut the original hole in the middle into a slot and it slid over the diff housing. I will need to brace it but thats very easy. This is have a really nice factory look too which is just what I want for anyone in blue looking at my car.
I have no idea about fitting axels off T-18 into a Trueno, I guess if its a zenki (earlier) trueno then it shouldnt be a problem but who knows
|
|
|
Location:
S.E suberbs, Vic
Registered:
December 2003
|
|
|

Location:
Baulko Hillo
Registered:
April 2004
|
|
Re: Project 86 - Big worklog with heaps of pics
|
Thu, 03 March 2005 22:35
|
|
Hey Sam,
Nice work there mate! As I've said in the other thread about RWD 20V's, the RWD 16V waterpump pulley lines straight up. $80 brand new if you can't find a second-hand one. This solves that issue.
I'm pulling my 20V out this weekend, so I'll be taking a few snaps that I should have when I put it in. I'll be sure to include some of what I did with the bottom radiator hose outlet.
Cheers,
Jeremy.
|
|
|
I Supported Toymods
Location:
Perth
Registered:
May 2004
|
|
Re: Project 86 - Big worklog with heaps of pics
|
Fri, 04 March 2005 01:59
|
|
im going to be going 20V soon so ill appreciate all the pix u can take....
and the parts required
also how much power do u really get out of a 20V....like say ur driving along and nail a corner in second without kicking the clutch, just planting it....will it smoke the tyres?
Adam
|
|
|
Location:
Baulko Hillo
Registered:
April 2004
|
|
Re: Project 86 - Big worklog with heaps of pics
|
Fri, 04 March 2005 02:10
|
|
| Bobski wrote on Fri, 04 March 2005 12:59 |
im going to be going 20V soon so ill appreciate all the pix u can take....
and the parts required
also how much power do u really get out of a 20V....like say ur driving along and nail a corner in second without kicking the clutch, just planting it....will it smoke the tyres?
Adam
|
No problem. And as for the smoking the tyres stuff.... Depends what tyres I guess. They certainly don't have the torque to really fry teh tyr3z, but are an exceptionally fun engine to have in an AE86. I'm gonna really miss mine 
|
|
|
I Supported Toymods
Location:
Perth
Registered:
May 2004
|
|
Re: Project 86 - Big worklog with heaps of pics
|
Fri, 04 March 2005 02:32
|
|
what are you changing to?
Is it a big improvement on the bluetop? mine is the jap spec one 96kw....
Also what do they rev to? its something like 9 isnt it?
Adam
|
|
|
Location:
Baulko Hillo
Registered:
April 2004
|
|
Re: Project 86 - Big worklog with heaps of pics
|
Fri, 04 March 2005 02:36
|
|
You'll see what I'm changing to soon enough....
Put it this way, a few 4AGTE's that I've raced found it difficult to (or just plain weren't able to) get in front.
They go hard man, and are smooth as if tuned right. Mine makes around 95rwkw (around 125rwhp).
|
|
|
I Supported Toymods
Location:
Perth
Registered:
May 2004
|
|
Re: Project 86 - Big worklog with heaps of pics
|
Fri, 04 March 2005 03:05
|
|
OoooOOoooOo 
that sounds damn fine to me
would u recoment silver or black top?
Also were u running individual coils and full ecu?
sorry about all the questions but yeah...im trying to find out exactly what im getting myself into
cheers
Adam
|
|
|
Location:
Baulko Hillo
Registered:
April 2004
|
|
Re: Project 86 - Big worklog with heaps of pics
|
Fri, 04 March 2005 03:14
|
|
| Bobski wrote on Fri, 04 March 2005 14:05 |
OoooOOoooOo
that sounds damn fine to me
would u recoment silver or black top?
Also were u running individual coils and full ecu?
sorry about all the questions but yeah...im trying to find out exactly what im getting myself into
cheers
Adam
|
Blacktop definately if you can get one for a reasonable price. Otherwise silvertops are still a hell-of-a-lot of fun.
I ran quad Bosch coils.
http://forums.toymods.org.au/index.php?t=msg&t h=34417&start=0&rid=5429&S=502f307f15d 203389489c0de945156b5
Sorry to hijack Sam! 
|
|
|
I Supported Toymods
Location:
Perth
Registered:
May 2004
|
|
Re: Project 86 - Big worklog with heaps of pics
|
Fri, 04 March 2005 04:26
|
|
yeah sorry mate... 
keep us posted on how ur project goes
Adam
|
|
|
Location:
S.E suberbs, Vic
Registered:
December 2003
|
|
Re: Project 86 - Big worklog with heaps of pics
|
Fri, 04 March 2005 05:32
|
|
|
nah its all good guys, I hope to make my top water pipe tomorrow so I will take a pic of that if I get it done. Also one of my alternator bracket too.
|
|
|